Showing posts with label Frosting. Show all posts

Thursday, June 7, 2012

Blueberry Sweet Rolls

 
There is a certain bakery near us that has the most amazing sweet rolls. People will often bring them for us at my work, or if it has been a while we will encourage our boss to get some on her way in. Everyone loves them. They have a wide variety of flavors including cinnamon, blueberry, raspberry, and orange. Yes I have tried them all, and no I can not pick a favorite. My favorite changes depending on my mood that day, but I can tell you that I always enjoy them. Well this week we found blueberries on sale at Winco. We of course had to get as many as possible. I was really in the mood for some sort of bread and decided that I could make blueberry sweet rolls just like the local bakery. I made them and was so glad that I did. I could have eaten the whole pan. Luckily (for my thighs) I refrained. But needless to say they are delicious!


Blueberry Sweet Rolls

Dough
5 1/4 c. white flour
1/4 c. sugar
1 1/2 tsp. salt
1 1/2 rounded tablespoons saf-instant yeast
3 T. oil
2c. hot tap water


Filling
2 cups blueberries
1/2 cup sugar
2 tbs flour
2 tsp lemon juice
3 tbs butter

Browned Butter Glaze
1/4 cup butter
2 cups powdered sugar
1-2 tbs milk
1 tsp vanilla

Directions:

Preheat the oven to 375 degrees. Line a jelly roll pan with tin foil or a silpat to help with the clean up process.

For the dough: Mix dry ingredients to bowl of stand mixer. Add oil and water. Mix for 1 minute and check consistency. If dough is too dry, add a little more water, if too wet add more flour. Dough should clean the bowl of the mixer. Mix for 5 minutes. (Do not add flour to the dough after it has finished mixing.) Let dough sit in the mixer for 10 minutes (set a timer if you are like me and most likely would forget about it). After the 10 minutes is up turn the mixer on for about 30 seconds then turn it back off again. Repeat the process of letting the dough rest/rise then turning on mixer 2 more times.  During the down time make the filling.

Filling: Combine all ingredients in a blender or food processor. Blend until fruit is blended down and more liquid. I like mine quite blended, but if you like more chunks feel free to only blend it a small amount or add fresh blueberries after the blending process is done. Pour blended blueberry mixture into a medium size sauce pan. Place the pan over medium heat. Heat until mixture thickens. Once thick take off heat and set aside to cool. It is ok if it is still warm, but you don't want it boiling hot when you spread it on the dough.

After the final resting and turning on the mixer process turn dough onto a well floured surface. Split the dough in half working with one half at a time. Roll out half of the dough into a rectangle. Spread filling on rolled out dough. I found that cutting the dough into long strips with a pizza cutter and then rolling it up was easier and less messy than rolling it up then cutting it, but you can do this step however you want. Place rolled up sweet rolls on prepared baking sheet. Allow about an inch in between pieces to allow for rising, but to still let them tough slightly once baking. Bake at 375 for 15-20 minutes or until dough is a light golden brown.


Browned Butter Glaze: Over medium heat heat butter until it is browned. (It starts turning a nice amber color and gives off the most delicious nutty smell) Pour browned butter into a heat proof bowl and add powdered sugar and milk. Mix with a whisk or hand mixer until combined. I like mine to be just slightly thinner than I would make it if I wanted it to be spreadable. Drizzle glaze over warm sweet rolls and enjoy!


Saturday, April 28, 2012

The Best Buttercream Frosting

I love a good frosting. I have been making a lot of cakes lately and this is by far my favorite frosting. Classic American Buttercream frosting. This recipe uses powdered sugar, butter, vanilla and milk. This is a great recipe for decorating and piping on cupcakes and cake. The secret to this frosting's awesomeness is the almond extract. I love it! I hope you enjoy it as much as I do.


Classic Vanilla Buttercream Frosting

Serves: 2.5 cups

Ingredients
1 cup unsalted butter (2 sticks or 1/2 pound), softened (but not melted!) Ideal texture should be like ice cream.
3-4 cups confectioners (powdered) sugar, SIFTED
1/4 teaspoon table salt
1 tsp vanilla extract
1 tsp almond extract
up to 4 tablespoons milk or heavy cream
Instructions

Beat butter for a few minutes with a mixer with the paddle attachment on medium speed. Add 3 cups of powdered sugar and turn your mixer on the lowest speed (so the sugar doesn’t blow everywhere) until the sugar has been incorporated with the butter. Increase mixer speed to medium and add vanilla extract, salt, and 2 tablespoons of milk/cream and beat for 3 minutes. If your frosting needs a more stiff consistency, add remaining sugar. If your frosting needs to be thinned out, add remaining milk 1 tablespoons at a time.

Saturday, April 21, 2012

Rainbow Cake

My sister in law asked me to make this cake a while back. When she sent me the picture of it I thought it just might be the cutest cake ever! The recipe I found for it sounded good. I set out to make the cake, was loving every minute of it. I should have known better when the recipe used something other than a buttercream frosting. I put all 6 layers on the cake, started frosting the outside of the cake and then disaster struck. My beautiful fun cake slowly started sliding. The more I tried to stop it the more it slid. You know on Sleeping Beauty (I think thats the one) when the 3 fairies are are making her birthday cake and it starts falling over and they put a broomstick to hold it up? Well thats what I wanted to do, but couldn't. It was very tragic! Ever since this horrible cake experience I have been even more determined to make this cake. I have learned from my mistakes and have made a beautifully fun rainbow cake!


Here are some tips for making this cake a success for you the first time.

First: Gel food colors are awesome! You need much less food color to get the beautiful bright colors that are so awesome in this cake.

Second: Make sure you cake is cooked thoroughly, and cooled thoroughly before trying to do anything with it. If your cake is too soft it will fall apart. If it is warm at all the frosting wont be strong enough to hold everything in place. This takes me to my next type...

Third: Make sure you are using a sturdy frosting. You need your frosting to be just soft enough to spread it on the cake without ripping the cake apart, but still thick and sturdy enough that your layers are going to slide off.

Fourth: Know that you can use whatever colors you want. I thought the rainbow colors were very fun, but I have also seen it done in different shades of pink. If you want different colors then do different colors!

Fifth: If you do make this cake, and it turns out perfectly for you (which I know it will ) then you are bound to be the favorite cake maker your friends and family have ever known. Good work.

Rainbow Cake

Ingredients

Vegetable shortening
3 cups all-purpose flour
4 teaspoons baking powder
1/2 teaspoon salt
2 sticks (1 cup) unsalted butter, room temperature
2 1/3 cups sugar
3 egg at room temperature
2 teaspoons pure vanilla extract
1 1/2 cups milk, room temperature
Red, orange, yellow, green, blue, and purple gel food coloring
Your favorite Butter cream Frosting (you will want at least double what you normally use)

Directions

Preheat oven to 350 degrees. Brush six 9-inch-round cake pans (or as many 9-inch cake pans as you have, reusing them as necessary) with shortening. Line bottom of each cake pan with parchment paper; brush again and set aside. If using pans that are prone to stick you might want to flour them as well.

In a large bowl, whisk together flour, baking powder and salt; set aside. In the bowl of an electric mixer fitted with the paddle attachment, cream together butter and sugar. Slowly add eggs  and mix until well combined. Add vanilla and mix until fully incorporated. Add flour mixture and milk in two alternating additions, beginning with the flour and ending with the milk. Mix until well combined.

Divide batter evenly between six medium bowls. Add enough of each color of food coloring to each bowl, whisking, until desired shade is reached. Transfer each color to an individual cake pan. Transfer to oven and bake until a cake tester inserted into the center of each cake comes out clean, about 15 minutes (working in batches if necessary).

Remove cakes from oven and transfer to a wire rack; let cool for 10 minutes. Invert cakes onto a wire rack; re-invert and let cool completely.

Using a serrated knife, trim tops of cakes to make level. Place four strips of parchment paper around perimeter of a serving plate or lazy Susan. Place the purple layer on the cake plate. Spread a scant 1 cup buttercream frosting over the first layer with a small offset spatula so it extends just beyond edges.

Repeat process with blue, green, yellow, and orange layers.

Place the remaining red layer on top, bottom-side up. Gently sweep away any loose crumbs with a pastry brush. Using an offset spatula, cover the top and sides with frosting. Refrigerate until ready to use.

Recipe Source: Martha Steward

In case any of you wanted to see pictures of my first cake (the disastrous one) here you go.

Rainbow Cake looking beautiful and fun

And now for the Rainbow cake in its final disastrous state :(


Tuesday, February 14, 2012

Cinnamon Roll Cake

Are you still trying to figure out what to make for Valentines Day? Well look no further my friends. This cake is so moist and delicious. It tastes just like a cinnamon roll but in cake form!


Cinnamon Roll Cake
Cake:
3 c. flour
1/4 tsp.salt
1 c. sugar
4 tsp. baking powder
1 1/2 c. milk
2 eggs
2 tsp. vanilla
1/2 c. butter, melted

Topping:
1 c. butter, softened
1 c. brown sugar
2 Tbsp. flour
1 Tbsp. cinnamon

Mix everything together except for the butter. Slowly stir in the melted butter and pour into a greased 9x13 pan. For the topping, mix all the ingredients together until well combined. Drop evenly over the batter and swirl with a knife. Bake at 350 for 28-32 minutes.

Glaze:
2 c. powdered sugar
5 Tbsp. milk
1 tsp. vanilla

While warm drizzle the glaze over the cake.

Recipe Courtesy of: Cookin' Up North

Sunday, November 27, 2011

Sans Rival Cake

Catherine of Munchie Musings was our November Daring Bakers’ host and she challenged us to make a traditional Filipino dessert – the delicious Sans Rival cake! And for those of us who wanted to try an additional Filipino dessert, Catherine also gave us a bonus recipe for Bibingka which comes from her friend Jun of Jun-blog.

This cake is quite delicious. It is not too rich, but still has a delicious flavor. I think my favorite part of this cake was honestly the frosting. This frosting has a subtle sweetness and is oh so smooth and creamy! It seriously melts in your mouth! I think this recipe is definitely a keeper for me! The only thing I changed is that I used almonds instead of cashews and loved it. I'm not a big cashew person so feel free to use them if you prefer.


Sans Rival Cake

Preparation time:  
Batter prep: 20 minutes
Baking: 30-60 depending on layers
Frosting: 30 minutes
Assembly: 15 minutes

Ingredients
10 large egg whites, room temp
1 cup (240 ml) (225 gm) (8 oz) white granulated sugar
1 teaspoon (5 ml) (3 gm) cream of tartar
¼ cup (60 ml) (20 gm) (2/3 oz) Dutch processed cocoa
(optional and not traditional) 
2 cups (480 ml) (240 gm) (8½ oz) chopped, toasted almonds 

Directions:
Note: You will need four layers which will mean that you might have to bake in two batches. Be sure to use fresh parchment paper and cooled pans for each batch.

1. Preheat oven to moderate 325°F/160°C/gas mark 3.
2. Line cake pan bottoms with parchment paper and butter and flour the sides really well. 
3. In a large clean, dry glass or metal mixing bowl, beat egg whites on medium until foamy (2 mins.).
Sprinkle with cream of tartar. Gradually add sugar, a couple of tablespoons at a time, continuing to
beat now at high speed until stiff shiny peaks form.  (about 7-10 mins.) 
4. Fold in nuts, reserving enough to use for decoration. 
5. Divide meringue into four equal parts. Spread in pans, evenly to edges. If doing batches, use fresh
parchment paper and cooled pans for each batch.  
6. Bake in preheated oven for 30 minutes, or until golden brown. Remove the meringue from the
baking pans while still hot; allow to cool slightly. Peel off the parchment paper while it is still warm,
it is difficult to remove sometimes when they have completely cooled.  
7. When cool, trim edges so that all 4 meringue layers are uniformly shaped. Set aside.


French Buttercream:

Ingredients
5 large egg yolks, room temperature 
1 cup (240 ml) (225 gm) (8 oz)  white granulated sugar
1/4 cup (60 ml) water 
1¼ cup (300 ml) (2½ sticks) (285 gm) (10 oz) unsalted butter, room temperature 
Optional Flavorings: 2 oz (55 gm) unsweetened chocolate, melted, or 1½ teaspoon (7 ½ ml) almond extract,
or 1½ teaspoon (7 ½ ml) vanilla extract, or any flavor you like

Directions:

1. Put the egg yolks in a mixing bowl. Beat at high speed until the yolks have doubled in volume and
are a lemon yellow.
2. Put the sugar and water in a heavy pan and cook over medium heat, stirring the sides down only
until all the sugar is dissolved and the syrup reaches 235°F/112°C (or thread stage). 
3. With the mixer on high, very slowly pour the syrup down the sides of the bowl, until all has been
added. Be careful as the very hot syrup could burn you if it splashes from the beaters. Continue
beating on high until the mixture is ROOM TEMPERATURE (about 15 mins). Still on high, beat in
the soft, room temperature butter a tablespoon at a time. Add flavoring after you beat in the butter.
Refrigerate the buttercream for at least an hour, and whip it smooth just before you use it. 

Assembly: 
Set bottom meringue on cake board with a dab of butter cream to hold it in place. Spread a thin
layer of buttercream and then place another meringue on top. Repeat with a thin layer of 
buttercream, meringue, thin layer of  buttercream, meringue, and finally buttercream the top and
sides. Decorate with reserved nuts.

Friday, October 7, 2011

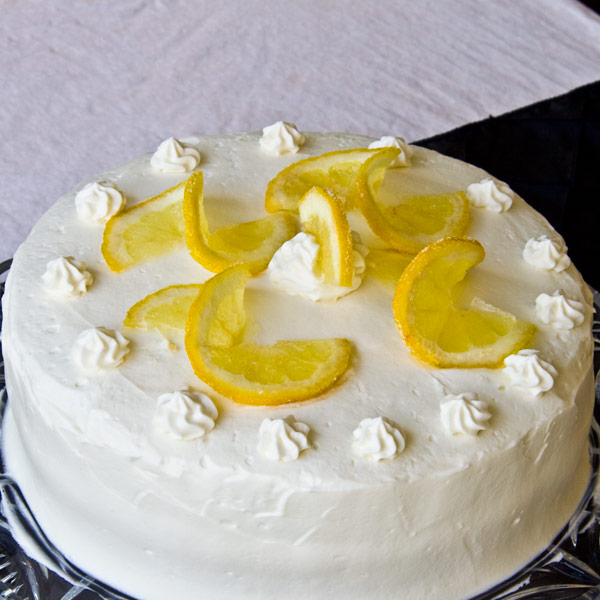
Lemon Cake with Lemon Filling

My husband and I took the long way home the other day and decided to go on one of our favorite drives. It is this beautiful drive that takes us up over one mountain and down into another valley. We accidentally stumbled upon this road when we were trying to take the scenic route home, but took the wrong scenic road. We ended up in city we weren't planning on going to, but it was totally worth the few extra miles. Luckily around here all of our cities are pretty close so it didn't take us that much longer to get home.I have been talking about the fall colors recently and how I love them. I just thought I would first share with you all a little glimpse of how our mountains are looking right now.


There still is a surprising amount of green up in the mountains so we plan enjoying the beautiful fall colors more over the next week or two.

Ok now on to more drool worthy topics. It was my brother in law's birthday last weekend and I was lucky enough to make his birthday cake. He had some very specific requests as to what kind of cake he wanted. He wanted a lemon cake with lemon filling, cream cheese frosting, and lemons dipped in sugar on it. I set out to meet this challenge, just hoping it would turn out well. I personally think that lemons are often forgotten, or not valued as they should be. I would have never thought to make him a lemon cake, but let me tell you I was sure glad that I did. The cake turned out delicious. Everyone really enjoyed the cake. The cake itself had a mild lemon flavor, the filling is tart and very lemony, and the cream cheese frosting has a little bit of tang all on its own that was absolutely delicious. I used the whipped cream cream cheese frosting that I posted the other day and it was perfect! I hope this post reminds you all of how much you love lemons!


Lemon Cake with Lemon Filling

Ingredients
2 cups all-purpose flour
2 teaspoons baking powder
1 teaspoon salt
1/2 cup butter
1 1/4 cups white sugar
3 eggs
1 teaspoon vanilla extract
1/4 tsp lemon extract
3/4cup milk
1/4 cup lemon juice

1 tablespoon grated lemon zest
1/2 cup fresh lemon juice
1 tablespoon cornstarch
6 tablespoons butter
3/4 cup white sugar
4 egg yolks, beaten

Directions:
Preheat oven to 350 degrees F (175 degrees C). Grease and flour two 8 inch round pans. Mix together the flour, baking powder and salt. Set aside.

In a large bowl, cream together the butter and sugar until light and fluffy, about 5 minutes. Beat in the eggs one at a time, then stir in the vanilla, lemon extract, and lemon juice. Beat in the flour mixture alternately with the milk, mixing just until incorporated.

Pour batter into prepared pans. Bake in the preheated oven for 30 minutes, or until a toothpick inserted into the center of the cake comes out clean. Allow to cool in pans on wire racks for 10 minutes. Then invert onto wire racks to cool completely.

To make filling: In medium saucepan, mix together 1 tablespoon lemon zest, 1/2 cup lemon juice and 1 tablespoon cornstarch until smooth. Mix in 6 tablespoons butter and 3/4 cup sugar, and bring mixture to boil over medium heat. Boil for one minute, stirring constantly. In small bowl, with a wire whisk, beat egg yolks until smooth. Whisk in a small amount of the hot lemon mixture. Pour the egg mixture into the sauce pan, beating the hot lemon mixture rapidly. Reduce heat to low; cook, stirring constantly, 5 minutes, or until thick (not to boil).

Pour mixture into medium bowl. Press plastic wrap onto surface to keep skin from forming as it cools. Cool to room temperature. Refrigerate 3 hours.

To assemble the cake, trim off any excess on the top of each cake so that when they are placed on each other they will sit as flat as possible. Place bottom cake layer on a cake pan. Spread with lemon filling. Place second layer on top of filling. Frost as desired.


Recipe Source: Adapted from Allrecipes

Wednesday, October 5, 2011

Whipped Cream Cream Cheese Frosting

This frosting is so good that I think it deserved its own post. I absolutely love cream cheese frosting. I think they are heavenly especially when combined with some sort of delectable cake or brownie.  Most cream cheese frosting are heavy and rich (not a bad thing if you ask me). This cream cheese frosting is light and airy, but yet still full of flavor. It would go perfectly on just about any cake. I used it on a delicious lemon cake that I will post in a couple of days.


Whipped Cream Cream Cheese Frosting

Ingredients
1 (8 ounce) package cream cheese (at room temperature
1 1/4 cup white sugar
1/8 teaspoon salt
1 teaspoon vanilla extract
1 1/2 cups heavy whipping cream

Directions
In a small bowl chilled beat whipping cream until very stiff peaks form (if you beat it any longer it will probably turn into butter); set in the fridge.
In a large bowl combine cream cheese, sugar, salt and vanilla. Beat until smooth, then fold in whipped cream. Frost cake as desired.

*Note: This is a very soft light frosting. I was able to frost a 2 layer cake with it and pipe with it a small amount, but this is not an ideal frosting for piping, but it is an ideal frosting for eating so do with it as you please. This is also a delectable fruit dip.


Recipe Source: Adapted from Allrecipes

Monday, June 13, 2011

Unbelievable Chocolate Cake With Raspberry Filling

My husband's birthday was this last weekend and I spent the few weeks before trying to figure out the perfect combination of flavors for his cake. My husband loves a slight almond flavor in his frosting, he also loves chocolate, and I decided that I wanted to also have a raspberry filling (mostly cause I love raspberry filling). I didn't know exactly how all of this would taste together but I decided to go for it. The cake was really fun to make and it turned out really yummy too. The most important part was that he loved it!


Unbelievable Chocolate Cake

1 ¼ cups unsweetened cocoa powder
2 ½ cups all purpose flour
2 ½ cups sugar
2 ½ teaspoons baking soda
1 ¼ teaspoons baking powder
1 ¼ teaspoons salt
2 large eggs plus 1 large egg yolk
1 ¼ cups warm water
1 ¼ cups buttermilk
½ cup plus 2 tablespoons vegetable oil
1 ½ teaspoons pure vanilla extract

Preheat the oven to 350 degrees, making sure the baking rack is in the middle of the oven. Prepare your cake pans by cutting out a piece of parchment or wax paper to line the bottom of the pan. Grease the pans, place the parchment or wax paper in the bottom of the pan and lightly grease again. Dust the pans with flour (or cocoa powder if you don’t want the white dusting on the finished cakes). Set the pans aside.

Using a fine mesh strainer, sift together the cocoa, flour, sugar, baking soda, baking powder, and salt into a large bowl. Add the eggs, yolk, warm water, buttermilk, oil and vanilla. Mix on low speed (with a handheld mixer or in the bowl of an electric stand mixer) until smooth, about 3 minutes.

Divide the batter evenly between the prepared pans. Do not over fill the pans it will overflow in the oven.  Bake the cakes for about 32-35 minutes, until a toothpick inserted into the middle comes out clean or with moist crumbs. Do not over bake! Remove the pans from the oven and set the pans on a wire rack to cool for 15 minutes. Gently run a thin knife around the edges of the pans and  unmold the cakes, removing the parchment paper liners from the bottom of the cakes. Let them cool completely, top sides ups, on a wire rack. Trim the tops of the cake layers with a long serrated knife to make them level. Spread raspberry filling in center (recipe to follow or for a shortcut you could use a raspberry jam) and frost as desired. I used a delicious frosting that worked well with the flavors, but is not as sturdy as your typical butter cream frosting.


Raspberry Filling

16 oz. frozen raspberries, thawed
1/3 cup sugar
3 tbsp. cornstarch
1 tsp. lemon juice

To make the raspberry filling, drain the thawed berries, reserving the juice in a liquid measuring cup. Add enough water so that the total liquid equals 1¼ cups. Add the liquid to a medium saucepan with the sugar and cornstarch. Heat over medium-high heat, whisking occasionally, until the mixture begins to bubble and thicken. Continue whisking so no lumps form. Once thickened, remove from the heat and whisk in the lemon juice. Fold in the drained berries with a spatula. Cover and chill until ready to use. (The filling will continue to thicken as it chills.)


Magic Frosting

1 1/2 cups granulated sugar
1/4 cup all-purpose flour
3 tablespoons cornstarch
1/4 teaspoon salt
1 1/2 cups milk (I used 1% with stellar results)
1 1/2 teaspoons pure vanilla extract
1/2 teaspoon almond extract
24 tablespoons (3 sticks) butter, cut into 24 pieces and softened at room temperature

In a medium bowl, combine the sugar, flour, cornstarch and salt. Slowly whisk in the milk until the mixture is smooth. Place a fine-mesh strainer over a medium saucepan and pour the milk mixture through the strainer into the saucepan. Cook the mixture over medium heat, whisking constantly, until the mixture boils and is thick enough that it starts to become difficult to easily whisk. This could take anywhere between 5-10 minutes, depending on your stove, heat, etc. It should bubble quite a bit at the end (be careful of the splatters) and thicken considerably.

Transfer the mixture to a clean bowl and cool to room temperature – this is extremely important! If it is even slightly warm, the frosting won’t beat up properly. I refrigerated my initial mixture overnight. If you do this, make sure to pull it out in time to let it warm back up to room temperature. If you try to proceed with the rest of the recipe and the mixture is too cold, the butter won’t absorb into the frosting like it should.

Once the frosting is completely cooled to room temperature (it should have no hint of warmth at all!), beat the mixture with the vanilla on low speed until it is well combined, about 30 seconds (a stand mixer will work best for this). Add the butter, one piece at a time, and beat the frosting until all the butter has been incorporated fully, about 2 minutes. Increase the speed to medium-high and let the mixer work it’s magic. Beat the frosting for five minutes, until it is light and fluffy. Let the frosting sit at room temperature until it is a bit more stiff, about 1 hour.

Ganache

8 oz. bittersweet chocolate, finely chopped
1 cup heavy cream
3 tbsp. unsalted butter, at room temperature

To make the ganache, place the chopped chocolate in a heatproof bowl. Heat the cream in a saucepan and bring to a simmer. Immediately remove from the heat and pour the hot cream over the chopped chocolate. Let stand 1-2 minutes, then whisk together until a smooth, thick ganacheganache sit to thicken a bit so that it is suitable for spreading and piping. You can use some of this ganache in a pastry bag fitted with a plain round tip. You can pipe a small amount around the top edge on your bottom layer to help keep filling in.

Chocolate Glaze

4 oz. bittersweet chocolate, finely chopped
½ cup heavy whipping cream
¼ cup light corn syrup
2 tsp. vanilla extract

To make the chocolate glaze, place the chocolate in a medium bowl. Heat the cream in a small saucepan over medium heat until simmering. Pour the hot cream over the chocolate and let sit 1-2 minutes. Whisk until the mixture is smooth and homogeneous. Blend in the corn syrup and vanilla. Pour the glaze into a pitcher or measuring cup and let cool for 10 minutes. (Do not let the glaze cool longer or it may become difficult to pour over the cake.) Slowly pour the glaze over the cake, ensuring that the top is covered and the glaze drips over the sides. Let the glaze set about 5-10 minutes. Meanwhile, bring the remaining reserved ganache to a consistency for piping. (You can microwave in 5 second intervals on low power – it won’t take long to rewarm. If you overshoot and the ganache becomes too thin, simply chill again in the fridge or freezer until it is thick enough to pipe.) Transfer the ganache to a pastry bag fitted with a decorative tip. Pipe swirls of ganache around the edge of the top of the cake and top each swirl with a fresh raspberry. Chill the cake until ready to serve. 

Recipe Sources: Cake - Mel's Unbelievable Chocolate Cake, Frosting - Mel's Magical Frosting, Raspberry Filling, Ganache, and Chocolate glaze - Annies Eats

Friday, May 20, 2011

Velvet Almond Buttercream Frosting

My sweet husband made me an amazing cake for my birthday. The cake was delicious but my favorite part was the frosting! I am not a fan of store bought frosting, but I LOVE homemade frosting. This frosting has such a great flavor. It is a perfect frosting for most cakes. It was light and creamy with an amazing almond flavor. I thought I would share the recipe for any of you frosting lovers out there.


Velvet Almond Buttercream Frosting

1/2 cup butter, softened
4 1/2 cups confectioners' Sugar
3/4 Tsp. Vanilla ext.
1/2 Tsp. Almond ext.
6-7 Tbsp. Milk

1.) Cream butter in mixing bowl until fluffy. Beat in confectioner's sugar 1-2 cups at a time with mixer. Add extracts.

2.) Add milk 3 Tbsp. at a time until the desired "frosting" consistency is achieved.

**This recipe can also be easily doubled and frozen- I always have a batch in the freezer!

It is also versatile and can be added to/ changed to make:

-Chocolate buttercream frosting (replace 1/2 cup of pwdr. sugar with cocoa),

-Lemon (replace milk with lemon juice and add 1 Tsp. lemon peel),

-Peanut Butter (1/2 Cup peanut butter instead of regular butter)

-Peppermint (Replace Vanilla ext. with peppermint)

Recipe Source: Bake Space