Showing posts with label Side Dish. Show all posts

Thursday, May 10, 2012

7 Layer Bean Dip

I'll be honest I never thought I was a fan of 7 layer dips. I'm actually a very picky eater and don't like things that most people put in it. So when my husband suggested that we bring a 7 layer bean dip to a super bowl party I looked at it as a challenge. I looked up several recipes, took some recommendations from my husband, and voila this 7 layer bean dip was created. I didn't take a picture of it that day, mostly because I didn't know if I was going to like it. With my first bite I knew that it was love. I honestly don't know if anyone else at the party was able to eat it. My husband and I stayed by that dip and chowed down. I tried to eat other foods, but kept finding myself right back at the bean dip. I was kicking myself all night that I didn't take a picture of it before I started devouring it. I knew this dip was totally blog worthy.

Since that time I haven't really had a reason to make this dip. Today I decided that I was making a reason to make this dip. If you really need to know, we may or may not have just had chips and this dip for dinner. I'm not confessing anything, but I am saying its possible. Regardless of when, where, why, and how much of this dip we ate, the conclusion was that we still love it. The best part is most of the ingredients I have in my house most of the time. I hope you enjoy this dip as much as we do.


 Look at all these delicious layers!

 You better believe that we ate that bite!

7 Layer Bean Dip

1 (16 oz) can re-fried beans
1 (1 oz) package taco seasoning
1 (8 oz) package cream cheese
16 oz sour cream
16 oz salsa
1 large tomato chopped
1 avocado sliced thinly
2 cups sharp cheddar cheese
1 can sliced olives

Directions

  1. In a medium bowl, blend the taco seasoning mix and refried beans. Spread the mixture onto a large serving platter.
  2. Mix the sour cream and cream cheese in a medium bowl. Spread over the refried beans.
  3. Top the layers with salsa. Place a layer of tomato, avocado, and top with Cheddar cheese. Garnish with black olives. 
  4. Enjoy with your favorite chips (my favorite is Fritos or other corn tortilla chip but any chip will work) 
 
Recipe Source: Adapted from Allrecipes 

Wednesday, April 11, 2012

Naan - Indian Flatbread

I have been wanting to make this recipe for a long long time. It seems that every time I remember that I want to make it I just don't seem to have the time. The dough itself doesn't take long to make, but it does have to rise and rest for a while. Finally today I decided I just was going to do it.  I honestly didn't have any kind of Indian dish planned, but I decided that I love naan and therefore other Indian food is not required for me to make it. I am so glad that I finally made this. I may or may not have eaten just naan for dinner. Don't tell anyone!


Naan - Indian Flatbread

 *Makes about 12 pieces of naan

INGREDIENTS:
3-4 cups all-purpose flour
1 teaspoon salt
1/2 teaspoon active dry or instant yeast
1 1/2 cups milk
1 teaspoon sugar
3-4 tablespoons, melted butter

DIRECTIONS:
Pour the milk into a liquid measure and heat in the microwave until warm to the touch (about 110 degrees F on an instant-read thermometer). If using active dry yeast, mix the sugar and yeast into the milk and let it sit for 4-5 minutes until the mixture is foamy and the yeast has activated. Once the yeast/milk mixture is foamy, pour the mixture into a large bowl or the bowl of a stand mixer and add the salt and 2 1/2 cups of the flour (proceed with the second paragraph of the recipe). If using instant yeast, pour the warm milk into a large bowl or the bowl of an electric stand mixer. Add the sugar, instant yeast, salt and 2 1/2 cups of the flour. Proceed as directed below.

Mix well to combine. Continue adding flour gradually in small amounts, until a soft dough is formed that cleans the sides of the bowl. Knead the dough by mixer or hand until it is smooth and elastic, about 3-5 minutes in the mixer or 10 minutes by hand.

Place the dough in a lightly greased bowl and let it rest at room temperature, covered lightly with greased plastic wrap, for about 2 hours.

After the dough has rested, turn it onto a lightly floured surface (I like to use my roul’pat for this) and divide the dough into 12 equal pieces, rounding each into a ball shape. Cover the pieces with a towel and let them rest for 30 minutes. While the dough rests, preheat your oven to 500 degrees F and place a pizza stone on the bottom rack of the oven. (If you don’t have a pizza stone, try grilling the dough on a lightly oiled outdoor grill or use a hot griddle to bake the naan – you’ll have to experiment with cooking times but I’ve seen either of those methods used with cooking naan also.)

Once the dough has rested for 30 minutes, one by one, roll each piece into a circle about 6-8 inches wide, depending on how thin or thick you want your naan. Lay the circle of dough on the hot pizza stone and spritz lightly with water. Close the oven and bake the naan for 2-4 minutes, until it is lightly puffed (some pieces will puff more than others) and brown spots begin to appear on the top. Remove the naan from the baking stone and place on a cooling rack. Brush lightly with melted butter. I also sprinkled a tiny amount of cracked sea salt on top. If you want to make garlic naan you can use a garlic butter , and sprinkle a small amount of fresh chopped cilantro on top. Stack the hot naan on top of each other as it comes out of the oven. Cover with a towel and let the naan cool completely or serve warm.

Recipe Source: Mel's Kitchen Cafe

Saturday, April 7, 2012

Deviled Eggs

I know that this is a very basic recipe, but I'll be honest until now I never had a recipe I always used. I would go to the internet, cookbook, whatever to find a recipe. After making this recipe I no longer need to search for a recipe. This recipe is simple, basic,  and easy just how I like it! I have tried many recipes that are very salty. I don't need a ton of salt in my deviled eggs. If you are looking for a good basic deviled egg recipe this is it! I hope you enjoy it as much as I do.


Deviled Eggs

Prep Time: 15 minutes
Servings 2-4

Ingredients
6 hard-cooked eggs
2 tablespoons mayonnaise
1 teaspoon sugar
1/2 - 1 teaspoon white vinegar
1 teaspoon prepared mustard
1/4 teaspoon salt (salt to taste)
Paprika


Directions
Slice eggs in half lengthwise; remove yolks and set whites aside. In a small bowl, mash yolks with a fork. Add the mayonnaise, sugar, vinegar, mustard and salt; mix well.  I recommend adding less salt at first, trying a small amount and then adding more if needed. I also recommend doing this with the vinegar until you get the right amount of tang that you like. Stuff or pipe egg yolk mixture into egg whites. Sprinkle with paprika. Refrigerate until serving.

Note: If you find your yolk mixture to be dry add some extra mayonnaise 1 tsp at a time until you get the consistency you like.

Recipe Source: Adapted from Allrecipes

Wednesday, February 1, 2012

Homemade Croutons

I love finding little recipes that use things (like bread) that I might end up throwing away. I also love when those little recipes taste amazing! I don't know if you all know this but croutons are far from healthy (this recipe included). Yes there might be little things you could do to make it more healthy like use olive oil istead of butter, but if you want really yummy croutons butter is the way to go!


Homemade Croutons
1 loaf french bread cubed (about 8 cups cubed bread chunks
1/2 cup butter
1 tsp italian seasoning
1 tsp salt
2 cloves garlic minced*

In a microwave safe bowl combine butter, italian seasoning, salt, and garlic. Heat in microwave for 30-60 seconds until butter is melted and bubbling slightly. Set aside. In a large bowl place cubed bread chunks. French bread works great, but really any type of bread will work just fine. Slowly drizzle butter mixture over bread stirring while you pour. Try and evenly coat each piece of bread with the butter mixture. Pour bread onto a cookie sheet in a single layer. Bake at 300 for 20-30 minutes or until golden brown and crunchy. Croutons can be eaten immediately or stored in an air tight container or zip lock bag for a few weeks.

*You can use 1 tsp garlic powder instead of the cloves of garlic if you prefer.

Friday, January 20, 2012

Cheesy Garlic Bread Sticks

This is another great post courtesy of Pinterest. I saw this a while ago and have had it in the back of my mind. Today I finally decided to make it and guess what...It's fantastic! I mean really how can you go wrong with garlic butter, two cheeses, and bread? These are all some of my favorite things! To be honest I used to have a slight problem with marinara sauce. I have almost completely gotten over my problem, but as a kid I didn't even like pizza. I mean what kid doesn't like pizza? Well I have never claimed to be a normal eater, but surprisingly my tastes have expanded to include pizza. I actually really enjoy pizza now, but if the option is there I will still usually get one with a white sauce or something kinda different. Regardless of my current pizza likings, this garlic cheese bread is a perfect companion for any pizza, or really any meal. We kinda ate it as our entire meal (again, I'm not claiming that my eating habits are normal). 

You can make this with your favorite pizza dough, but just in case you don't have a favorite pizza dough recipe I have put one on here as well.

Cheesy Garlic Bread Sticks
yield: 1- 12 inch pie

Ingredients:
1/2 recipe Fail-Proof Pizza Dough (recipe below)
2 tablespoons softened salted butter
2 cloves garlic, finely minced
1/4 cup grated parmesan cheese {use the real stuff!}
1/4 pound grated mozzarella cheese
{salt & pepper, if desired}

Directions:
Preheat oven to 500 degrees with pizza stone inside. {If you don’t have a pizza stone, use an upside down cookie sheet}

Mix butter and garlic in a small bowl and set aside.

Spread pizza dough out into a 12-inch circle on parchment paper. {This makes it easier to transfer to the pizza stone.}

Spread the butter and garlic mixture over dough and top with parmesan and mozzarella cheeses. Top with a light sprinkling of salt and pepper, if desired.

Bake 9-10 minutes or until bubbly and golden. Remove from oven and cool 1-2 minutes before cutting. Serve hot, with marinara {if desired}. 


Basic Pizza Dough
yield: 2-12 inch pizzas, approximately 1 lb. of dough


Ingredients:
1 cup warm water
2 1/4 teaspoons active dry yeast
1 tablespoon honey {or sugar}
2 teaspoons salt
2 tablespoons olive or canola oil
3 cups bread flour {give or take 1/2 cup…depending on the heat & humidity}

Directions:
In a large mixing bowl, preferably that of a stand mixer, stir yeast and honey into warm water. Sit for 5-10 minutes or until bubbles form and mixture starts to foam. This tells you that the yeast is alive and kicking. Pour in salt, oil and half the flour and mix.

Once that flour is incorporated, start adding flour in bit by bit until you get the pizza dough to the consistency you want: slightly tacky, but when you touch it it doesn’t stick to your hands.

Once you reach this stage, turn the mixer on high to knead for 6 minutes. Turn a timer on and walk away! Resist the temptation to stop earlier than 6 minutes! That seems to be the magical number. It should look something like this when it’s done! The dough should be smooth and easy to work with. And the bowl should be clean!

Lightly grease the bowl & the dough so it doesn’t dry out, cover with plastic wrap and let it rise 1-2 hours. That’s it!

Recipe Source: Lauren's Latest


Tuesday, January 3, 2012

Mama Mondola's Chicken Soup

I hope all of you had a fabulous Christmas and New Years! As one of my new years goals I have decided to eat less sugar. For me this means that for the month of January I have decided to cut out all cane sugar from my diet. In case you haven't noticed my dessert section is my largest section on this blog. That is because I LOVE desserts. I would say almost all of them contain cane sugar. This is going to be a fun challenge for me. I'm not saying I won't post desserts. I will just have to be more creative in using honey, agave, and xylitol.

Well to start off this no sugar month I decided to post this delicious soup. One of my husband's and my favorite restaurants is Carrabbas. My husband always gets this soup. It is hearty and full of flavor. He decided a while back that he wanted to make it. We have made it a few times since then and absolutely love it. This is a big recipe so be prepared. We honestly didn't have a pot big enough to hold the whole soup so we used less (a lot less) water. The flavor is still amazing it is just slightly more like a stew than a soup.


MAMA MANDOLA'S CHICKEN SOUP (MINESTRA DI POLLO)
From Carrabba's
Makes 1 1/2 Gallons

5 celery ribs
4 medium carrots, peeled
1 large yellow onion
2 medium potatoes, peeled
1 large green bell pepper
1(14-ounce) can imported Italian plum tomatoes
1(5-pound) hen, washed and cut into 8 pieces
1/2 cup chopped fresh Italian parsley
2 garlic cloves, finely chopped
6 quarts water (for soup) or 6-8 cups water for stew
Salt and freshly ground black pepper

Dice celery, carrots, onion, potatoes and bell pepper into 1/4-inch pieces. Chop tomatoes; reserve all juice.

Place vegetables, tomatoes with their juice, chicken pieces, parsley and garlic in a 10-quart stockpot. Add water. Season with salt and pepper. This can also be done in a crock pot (my personal preference)

Slowly bring soup to a boil over low heat. Skim off foam that rises to the surface; may have to skim 2 or 3 times. Partially cover pot and simmer 2 hours.

When soup is finished, remove chicken pieces with a slotted spoon. Let cool.

Meanwhile, mash vegetables in the bottom of the pot with the back side of a large cooking spoon or a potato masher.

When chicken has cooled enough to handle, remove skin and bones and return meat to soup.

Notes: Soup is best served the day after it is made. Refrigerate and remove fat that solidifies on the surface of the soup. Serve soup with rice or small, stubby pasta such as pastina, tubetti or small elbow macaroni. For better flavor, cook the rice or pasta in the soup when reheating. Add freshly grated Parmesan or Romano cheese, if desired.

Friday, November 18, 2011

Homemade Baked Tater Tots

I have slightly been on a baking drought lately. You see we went to Disneyland last week. Disneyland is wonderful and magical, but for some reason they wouldn't let me down into their magical kitchens to let me create things of my own. Strange I know. The day we got back from Disney I came down with a nasty cold. It is very hard for me to cook when I can't smell, taste, or really stand for long periods of time. Today I'm finally feeling a little better and I can taste so what do I do? Of course make some new creations!

I decided I wanted to try and make these at about 4:30 this morning. I woke up and couldn't go back to sleep and the only things I could think of were the things I wanted to make. This one being in the forefront of my mind. I kept thinking of how I was going to make them, and what spices i wanted in it. I eventually did fall back to sleep, but as soon as I woke up I knew what I needed to do! This was a fun experiment that turned out quite yummy! The unhealthy side of me would still have to admit that I slightly prefer the deep fried kind, but the healthy side of me often tries to suppress the unhealthy side and occasionally wins! Luckily with these bad boys both sides were pleasantly satisfied with them.


Homemade Baked Tater Tots

Prep time: 15 minutes
Bake time: 30 minutes
Makes about 30 mini tater tots

Ingredients:
4 medium sized potatoes
1 1/2 tsp salt
1 tsp smoked paprika
1/2 tsp pepper
1 egg slightly beaten
1 tbs oil
1/2 cup all purpose flour

Directions:
Wash and skin potatoes. Using a food processor with the shredding disk attached shred all four potatoes. You can shred them by hand if you don't have a food processor, but it is much faster with the food processor. With your hands scoop the shredded potatoes out of the food processing bowl and transfer to a medium sized bowl slightly squeezing with your hands to removed some of the excess juice from the potatoes. Add the salt, smoked paprika, pepper, egg, and oil to the shredded potatoes. Mix with a fork until well combined. Add flour and mix again with a fork.

Prepare a mini muffin pan by lightly spraying with cooking spray. You can also use a regular muffing pan if you don't have a mini one, your tots will just be bigger. Scoop about 1/2 tbs of potato mixture into each mini muffin tin. Pressing down slightly with the back of measuring spoon to make the potato mixture as flat as possible. Bake in a preheated 375 degree oven for 30 minutes or until golden brown and crispy. I flipped all of mine half way through the baking time just to make sure they would be crispy on all sides. I wanted mine a little on the crispy side so when they were about done I turned on the broiler and let them crisp up for just a few minutes. If you do this watch them carefully as to not let them burn. Remove from oven and place tots in a bowl and sprinkle a little extra salt on them. Serve plain or with whatever sauce you would like.

Wednesday, October 12, 2011

Browned Butter and Sour Cream Cornbread

Those of you that know me, or who read my blog frequently might know that I have an affinity toward browned butter. I have used it in several recipes, and have always loved the results. It adds such a richness to the flavor of things. Well today when I was at work I saw this recipe and knew I had to try it! This corn bread is not too sweet. It is a perfect sweetness for spreading some honey butter or just honey on top.


Browned Butter and Sour Cream Cornbread

Ingredients

4 tablespoons unsalted butter
1 teaspoon vegetable oil
1 1/2 cups stone-ground cornmeal
1/2 cup all-purpose flour
1/4 cup sugar
2 teaspoons baking powder
1 teaspoon salt
1/4 teaspoon baking soda
2 large eggs, lightly beaten
1 cup sour cream

Instructions

Melt butter in a small saucepan over medium heat, swirling often until lightly browned and nutty, about 4 minutes. Pour into a medium bowl, and set aside to cool.

Preheat oven to 400 degrees. Rub an 8-inch cast-iron skillet with the oil; place in oven to heat.

In a large bowl, combine cornmeal, flour, sugar, baking powder, salt and baking soda. Add eggs and sour cream to cooled butter, whisking well. Pour into dry ingredients, and stir just to combine, taking care not to overmix. Pour batter into skillet. Bake until golden and a toothpickinserted in the center comes out almost clean, about 20 minutes. Let cool in skillet 5 minutes, then turn onto a wire rack.

Recipe Source: Relish

Friday, September 30, 2011

Quinoa and Black Bean Salad


I want you all to know that I don't eat horribly all the time (unless I'm on a cruise). I actually really enjoy eating healthy. My one requirement for eating healthy is that it still has to taste good. I love adding whole grains to things to make them healthier. The greatest thing about this salad that it's not only healthy but it tastes great too! Even if you have never had quinoa (pronounced KEEN-wah in case you were wondering) this recipe is quick, easy, and bound to be a crowd pleaser.


Quinoa and Black Been Salad

Ingredients
2 tsp onion powder
3 cloves garlic, peeled and minced
3/4 cup uncooked quinoa
1 1/2 cups chicken broth
1 teaspoon ground cumin
1/4 teaspoon cayenne pepper
salt and pepper to taste
1 can corn kernels
1 (15 ounce) cans black beans, rinsed and drained
1/2 cup chopped fresh cilantro (optional - I personally hate cilantro so I left it out)

Directions
Place quinoa in a bowl of water and let soak for about 10 minutes. In a rice cooker combine the rest of the ingredients add in the quinoa and let cook in rice cooker until done (approx 20-30 minutes). Serve warm or cold. Serve as a side dish or a main course.

Recipe Source: Adapted from Allrecipes

Monday, September 26, 2011

Whole Wheat Banana Bread

I must first start off by telling you all that I just got home from a fabulous Alaskan cruise! In case you didn't know the average cruiser gains 1-2 lbs per day per cruise. That is horrible! That means on my 7 day cruise I could have gained 7-14 lbs. Wow! Luckily I didn't gain that much (it is hard not to gain a few). The reason everyone gains so much is because there is so much food available at all times. Not only is there a lot of food, but it is good food. The only thing I was disappointing by was their Alfredo sauce. Sadly that didn't live up to my likings, but everything else was fantastic. I had some of the best soups I have ever eaten, and their french toast was amazing! I will say that the most amazing part of an Alaskan cruise isn't the food. Alaska truly is beautiful! It might have rained almost every day, we had to avoid the open seas because there were 60 foot swells, and we had to make some changes to our itinerary due to the bad weather, but it was still incredible! I think my favorite place was a fjord named Tracey's Arm. This was our detour since we weren't able to make it to Hubbard glacier but it was stunning. I have never seen so many waterfalls in my life. Did you know that there really is blue ice? I always though it looked blue because of the ocean or sky, no it is actually blue. It is breathtaking.  Just imagine being surrounded by green mountains, waterfalls, and blue ice floating in the ocean! If you haven't been to Alaska and have an opportunity to go, take it!

Well the reason that I bring up our cruise (beside the fact that I am still in awe by it) is that after eating your weight in amazing food it is nice to get back and eat some simple home cooked food. The reason their food tastes so good is because it is not lacking in grease of fat. I am pretty sure 99% of the food we ate wasn't very good for us. This is fine for a week but we were really excited to eat our oatmeal for breakfast when we got home. Next I had to use the bananas that had gone very brown while sitting in my fruit bowl while we were gone. What is the best thing to do with old bananas? Of course I had to make this banana bread. This recipe is a healthified version of my mom's banana bread. Yes I do like to make up my own words on occasion.  Eating foods like this is such an easy way to get in your whole grains and fruits! Yes I also like to justify my eating of anything sweet. Enjoy.


Whole Wheat Banana Bread

1/2 cup butter
1 cup sugar
2 eggs
5 ripe bananas mashed
2 tbs chia seed (optional)
2 cups white whole wheat flour
1 tsp soda

Prepare 2 bread pans by lining them with tin foil. Spray the tin foil with cooking spray. Set aside. Cream butter and sugar. Beat in eggs. Add bananas and chia seed. Add flour and soda. Pour into prepared pans. Bake at 350 degrees for 1 hour. Cool before serving.

Wednesday, September 14, 2011

Basic Calzones

This week I have been making freezer meals. Lots and lots of them! It has been fun to just make a bunch of meals on a day off and know that some day in the future I can sit back and relax but still eat a home cooked meal. When trying to figure out what freezer meals to make one of my friends suggested calzones. I thought this was a great idea! I love pizza but this is an easier way to freeze a pizza!

Feel free to use whatever toppings you want. This is a very basic recipe that can be changed and adapted to whatever your likings are.


Basic Calzones
Makes approximately 6-8 medium sized calzones

Dough:
2 1/2 cups warm water
4 teaspoons instant yeast
4 tablespoons sugar
2 tablespoon honey
2  tablespoon olive oil
4 teaspoons salt
3 cups all-purpose flour
3 cups whole wheat flour

Toppings:
2 lbs shredded mozzarella cheese
1 pkg pepperoni
1 jar pizza sauce or spaghetti sauce

Make the dough the night before or early the morning on the day you want to make the pizza. In a large mixing bowl (or in the bowl of a stand mixer), mix the water, yeast, sugar, honey and oil. (If using active dry yeast, increase the amount of yeast to 2 3/4 teaspoons and proof the yeast in the water until foamy before mixing in the sugar, honey and oil.) Then mix in 1 cup flour and the salt. Continue mixing in all the remaining flour until you get a nice, soft dough. Knead until dough is soft and smooth, about 10 minutes by hand or 5 minutes with a stand mixer.
Shape the dough into a ball and place in a lightly greased bowl and cover tightly (with a lid or plastic wrap). Place the dough in the refrigerator to slowly rise until three hours before baking. Three hours before baking, remove the dough from the refrigerator and let it come to room temperature, keeping it lightly covered.

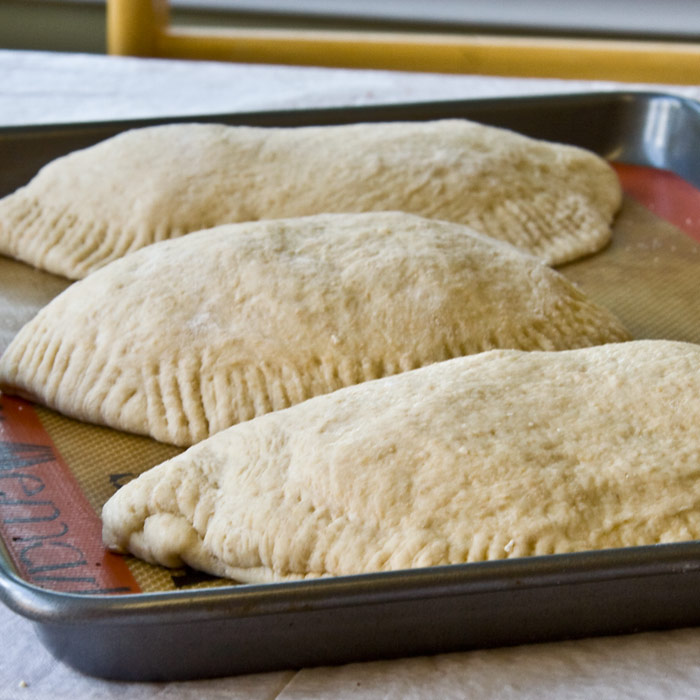
The next day remove dough from fridge about an hour before using. After hour has passed separate dough into 6-8 equal sized pieces. Cover each piece and let rest for about 10 minutes. Using a nonstick mat or a lightly greased counter top, working one at a time, start flattening each piece of dough into a circle.Eventually you’ll want it between six or eight inches in diameter. On the bottom half of the circle spread pizza sauce. Top with cheese and pepperoni (or desired toppings). Grab the top edge of the dough and fold over the toppings. You can stretch the dough if needed to cover entire toppings. Using the tines of a fork, press the edges of the calzone together until well sealed. Carefully lift and place each calzone on a silpat or parchment lined baking sheet.You should be able to fit about 3 moderate sized calzones on each baking sheet. Bake at 400 degrees for 14-15 minutes or until golden brown.

Freezer meal instructions: After calzones are formed place on a baking sheet and place in freezer overnight. Once frozen you can remove from pan and place in zip lock bags and freeze until ready to use. The night before baking place frozen calzones on a greased or silpat lined pan in the fridge to thaw. On baking day take out of fridge 1 hr before baking to bring to room temperature. Once thawed bake as directed above.

Dough recipe source: Mel's Kitchen Cafe

Friday, September 9, 2011

Zucchini Casserole

I first need to mention that every time I remember that we are already into September I want to cry. Just a little bit. Summer has just flown by! It really has been a great summer. It always seems that just as I am getting used to it being summer it is gone. Oh well. I will say that I am really excited to see all the pretty fall colors that are sure to be popping up soon.

As you may know our zucchini plant has done quite well this year. It really did take over our garden. We have been able to make lots of yummy foods and still give some away. It has been great. Here is another Zucchini recipe that really is one of my favorites! This casserole is full of flavor and really could almost be eaten as the main dish but I usually serve it as  a side. We had this at a family get together and I just knew that I had to have the recipe. We have had it several times since and I have loved it every time.


Zucchini Casserole

Ingredients:

7 cups zucchini thinly sliced
1/4 cup chopped onion
1 can cream of chicken soup
8 oz sour cream
1 cup shredded carrots
2 cups seasoned stuffing mix
1/4 cup butter melted

Directions:
In a large pot cook zucchini and onion in boiling salted water for 5-10 minutes. Drain well. In a large bowl combine soup and sour cream. stir in shredded carrots. fold in zucchini mixture. Toss stuffing mix with melted butter. Spread 1/2 stuffing mixture in a 12X7 baking dish (9X13 works too if you don't have a 12X7). Spoon zucchini mixture on top of stuffing. Sprinkle the rest of the stiffing mixture on top. Bake at 350 degrees for 25-30 minutes or until heated through.

Monday, September 5, 2011

Macaroni Grill Bread

I love bread! If a restaurant serves bread before the meal I am usually more excited to eat the bread than anything else. I don't know if it is just the fact that I am usually really hungry when they bring the bread out, or if the bread really is just amazing. Either way I love going to places that serve amazing bread. This restaurant is the same. I always love eating their bread. My mom actually gave me this recipe. She had it at a friends house and raved about it so much that I just had to get the recipe. This recipe really does come pretty close to the real thing, if I could only find some opera singer to come sing in my kitchen!


Macaroni Grill Bread
Yield: 2 loaves
Time: 1 1/2 hours start to finish

Ingredients:
1 1/2 t active dry yeast
1 C warm water
3 T olive oil
1/4 t sugar
2 1/2 C flour
1 1/2 t salt
1/4 t McCormick Italian Seasoning Grinder
1/4 t cracked black pepper
3/4 T fresh rosemary, snipped

1 egg
butter and salt


1. In the bottom of your mixer combine water, yeast and sugar. Mix it around a bit with a spoon and let it sit for 5 minutes.
2. Add the salt, oil and 1 C flour. Mix for 30 seconds to incorporate.
3. Add the rest of the flour about 1/2 C at a time, while the mixer continues to mix.
4. When all of the flour is incorporated mix on high for about 7 minutes.
5. While your mixer is doing it's fine work, get your herbs and seasonings ready to go. I like to snip rosemary with scissors. You don't want to eat any of the thick stem that rosemary comes on, only the little needles.
6. When your dough is done mixing add the rosemary, pepper and Italian seasoning. Mix just until incorporated.
7. Cover your mixing bowl with a kitchen towel and let it rise for about 40 minutes, or until doubled in size.
8. Divide the dough into 2 parts. Shape into balls and place on a sprayed cookie sheet, or a cooking stone with a bit of olive oil on it.
9. Spray a sharp knife with cooking spray and cut 2 slits in the top of the bread.
10. In a small bowl whisk an egg until frothy. Brush the egg all over the top of the loaf and into the cracks.
11. Place the loaves into a warm oven. (I set mine to 170) Let them rise until doubled in size, about 15 minutes.
12. Turn your oven up to 370 degrees and bake for about 20 minutes, or until golden brown.
13. When the loaves come out of the oven, place them on a cooling rack. Brush butter over the tops and sprinkle a little bit of salt over the top of the butter. Be careful to not get too much. I always use freshly cracked salt. You can buy both salt and pepper crackers at Costco these days. Look on the spice aisle.


Recipe Source: Jamie Cooks It Up!

Saturday, September 3, 2011

Zucchini Fries

What do you do when you have millions of zucchinis (or so it seems)? The best thing you can do is try millions of different zucchini recipes!

We had some friends over for dinner the other night. We knew we were having steaks, but that was it. I was trying to figure out what we could eat as a side dish and I remembered that we had about 6 zucchini sitting in a bowl just waiting to be used. I remembered seeing a recipe somewhere for zucchini fries. I thought this would be a perfect side dish for steaks because it combine your vegetable and your starch into one delicious side dish. The first zucchini fries I made were good, really good, but all the recipes seem to be pretty much the same. I decided to try and come up with my own. This recipe would be great for deep frying the zucchini fries, but since I try (sometimes) to be more healthy I decided to bake them in the oven. Frying would make them look a little more like a french fry, but they tasted great oven baked. You are welcome to cook them however you would prefer.


Zucchini Fries

1 medium zucchinis
1/4 cup flour
2 Tbs water
2 Tbs oil
1/2 tsp salt
1/4 tsp pepper
1 egg
1/4 tsp parsley
1/4 tsp garlic powder
1/4 tsp adobo seasoning (optional)
Olive oil or cooking spray

Preheat oven to 400 degrees. Prepare a baking sheet with tin foil, parchment paper or silpat. Drizzle some olive oil on baking sheet or spray with cooking spray. Set aside. Wash and dry zucchini. Cut off both ends off zucchini. Cut in half and cut into french fry sized slices.  Combine egg, oil and water. Whisk to combine. Add in salt, pepper, parsley, garlic, and flour. Mix until combined. Batter should be the consistency of pancake mix. Dip each slice of zucchini into batter coating evenly. You do not need a lot of batter, just enough to lightly coat zucchini. If you get too much it will all just drip off once you put it on the pan, but it won't ruin anything. Place the coated zucchini fries on the pan leaving space in between each one. Bake at 400 degrees for approximately 20-25 minutes or until golden brown. I personally enjoyed mine dipped in ranch.


Friday, August 12, 2011

French Bread

I am a carb-o-holic. I have admitted this before and if you see most of the things that I post this fact is very evident. The smell of fresh baked bread is one of my favorite smells. Really if I were a candle maker I would be working hard to try and make a candle that actually smelled like baking bread. The only thing I love more that the smell of fresh baked bread is eating it. Taking a nice big slice of warm bread and eating it with or without butter and homemade jam is seriously a small slice of heaven to me!

I have been wanting to make this french bread for a few days now. I ended up getting a headache and what should one do when they have a headache? Well naturally I went for a short run, took a hot shower, and made bread. My favorite part of this was obviously the bread! This bread is so basic yet the taste and texture of it are so amazing. The egg wash makes it slightly crispy on the outside and oh so soft and chewy on the inside. This is definitely a recipe I am going to be making again and again.


*Note: as with all yeast doughs, I never use the flour amount called for in the recipe as a hard fast rule (unless a weight measure is given and then I pull out my kitchen scale). Because humidity, temperature, altitude and a multitude of other factors can impact how much flour you need in your yeast doughs, I always judge when to quit adding flour by the texture and look and feel of the dough rather than how much flour I’ve added compared to the recipe. 

2 ¼ c. warm water
2 T. sugar
1 Tbsp yeast
1 Tbsp salt
2 Tbsp oil
5 ½ -6 cups flour-stirred before measured
Dissolve sugar and yeast in the warm water. Let this proof—or sit for a few minutes until it bubbles. Then add salt, oil and 3 cups of flour and beat well. Add in 2 1/2 -3 more cups of flour. The dough should clean off the sides of the bowl and not be too stick – but be careful not to add too much flour. Knead for a few minutes.
Leave the dough in the mixer to rest for 10 minutes and then stir it down (turn on your mixer for 10 seconds) and then allow to rest another 10 minutes. Repeat for a total of 5 times. Then turn dough onto a floured surface and divide into two equal parts. Roll each part into a 9×13 rectangle. Roll dough up, starting from long edge of loaf to seal. Arrange seam side down on large baking sheet that’s been sprinkled with corn meal, allowing room for both loaves. Repeat with second part of dough. With a sharp knife, cut 3 gashes at an angle on the top of each. Cover lightly; allow to rise 30 minutes. Brush entire surface with egg wash (one egg beaten slightly with 1 Tbsp of water). If desired, sprinkle with sesame seeds. Bake for 30 minutes at 375 degrees.

Recipe Source: Mel's Kitchen Cafe

Friday, July 22, 2011

Roasted Tomato Soup With Basil

It is no secret that I am a picky eater. One of the many things that I don't really enjoy eating are tomatoes. I don't like fresh tomatoes. The weird thing about my dislike for tomatoes is that I love ketchup, tomato soup, pasta sauce, and some salsas. My absolute favorite of these items is tomato soup. I love a nice bowl of tomato soup with a grilled cheese sandwich. My mom would always make that for us on a cold or rainy day. Well it is summer now, and we don't really have cold days for at least a few months, but I do for some reason have a lot of tomatoes. What better thing to do with fresh tomatoes than turn it into a delicious homemade soup.


Roasted Tomato Soup With Basil
  • 4 lb tomatoes, halved lengthwise
  • 6-8 garlic cloves, left unpeeled
  • 3 tablespoons olive oil
  • 1/2 teaspoon salt
  • 1/4 teaspoon black pepper
  • 1 medium onion, finely chopped
  • 2 teaspoons fresh oregano, minced [use only 1/2 tsp if you used dried]
  • 2 tablespoons fresh basil, minced [use only 1 tsp if using dried basil]
  • 2 tablespoons sugar
  • 2 tablespoons unsalted butter
  • 3 cups chicken stock or low-sodium broth
  • 3/4 cup heavy cream
Directions
Put oven rack in middle position and preheat to 350°F.

Arrange tomatoes, cut sides up, in 1 layer in a large shallow baking pan and add garlic to pan. Drizzle tomatoes with oil and sprinkle with salt and pepper. Roast tomatoes and garlic 1 hour, then cool in pan on a rack. Peel garlic.

Cook onion, oregano, basil, and sugar in butter in a 6- to 8-quart heavy pot over moderately low heat, stirring frequently, until onion is softened, about 5 minutes. Add tomatoes, garlic, and stock and simmer, covered, 20 minutes.

Puree soup in batches in a blender (use caution when blending hot liquids).  Stir in cream and salt and pepper to taste and simmer 2 minutes.

Divide soup among 8 bowls.

 Recipe Source: Adapted slightly from Caroline

Wednesday, July 20, 2011

Oriental Chicken Salad

I know many of you have probably had this salad before. It is a great easy salad to through together and is always a crowd pleaser. This was one of the only things I requested to be served at one of my bridal showers. I absolutely love it. The thing about this salad is that I forget about it for a while but when I remember it again I am so excited and love every second of eating it!


I must be honest I have one other reason why I was really excited to make this salad. Do you see the bowl that the salad is in? I don't think the picture does it justice but it is the coolest bowl. My sister in law gave it to us last year and I enjoy any excuse to use it. Really I should have just taken a picture bowl so you all could enjoy the beauty and color of it! I guess you will just have to use your imagination, but just know that it is awesome.

Oriental Chicken Salad

1 lb shredded cooked chicken
4 tablespoons toasted slivered almonds
4 tablespoons sesame seeds
1 head raw cabbage, chopped
2 pkgs chicken flavored Top Ramen (broken and uncooked)
4 stalks green onion, chopped (optional)
4 tablespoons sugar
1 cup oil (I used mostly olive oil with a few tbs sesame oil)
2 teaspoons salt
1/4 teaspoon pepper
6 tablespoons vinegar

In large bowl mix together the chicken, almonds, sesame seeds, cabbage, broken Ramen noodles and onion. In a separate bowl whisk together sugar, oil, salt, pepper, vinegar, and seasoning packets from the ramen noodles. Pour mixture over salad. If you like the noodles crunchy then serve immediately. If you prefer soft noodles then store in an airtight container overnight stirring occasionally.


Recipe Source: Adapted from CD Kitchen

Monday, July 18, 2011

Cookie Salad

A friend of mine from a few years back was so excited when she found out I had a blog. She told me that I had to post the recipe for the zebra cookies. I honestly had no idea what recipe she was talking about. I even googled zebra cookies to see if it would trigger a memory of some recipe I had made for her a few years ago, but it didn't work. I thought of all my cookie recipes and couldn't think of any that would even remotely resemble zebra cookies. I gave up the search and quickly forgot about her request. I'm sure she was frustrated that I never posted the recipe. She recently sent me another message asking me again to post the zebra cookie fruit salad thingy. This time the light went on! I knew exactly what recipe she was talking about and I am so excited to share it with all of you. Many of you might know this recipe. I personally like any way to get more fruits and veggies in, but in some sort of delicious unhealthy way. The fruit in this salad makes me feel a little bit better about eating all the cookies that are in it too! This is definitely a crowd pleaser for any age group!


Cookie Salad


Ingredients:

2 cups cold buttermilk

1 (5.1 ounce) package instant vanilla pudding mix

1 (12 ounce) container frozen whipped topping and thawed, or 12 oz heavy whipping cream whipped and lightly sweetened.

2 (11 ounce) cans mandarin oranges, drained

1 can pineapple

1 (11.5 ounce) package fudge striped shortbread cookies, coarsely crushed

In a bowl, whisk the buttermilk and pudding mix for 2 minutes. Let stand for 2 minutes or until soft-set. Fold in whipped topping and oranges and pineapple. Cover and refrigerate until serving. Fold in crushed cookies.

Monday, July 4, 2011

Cream Biscuits

Recently I have been trying to live on a budget. Mostly I have realized how much money I can spend simply on food. I have never really made myself have a budget before so this has been a good experience. Well this recipe came about because we ran out of milk and I have used all my budget this month so I refuse to go get more. It is breakfast time and most things I make call for milk. I thought of biscuits and decided those could work. I found this recipe that called for cream (instead of milk and butter) and decided to try it. This recipe is the easiest biscuit recipe I have ever made. I LOVE that you don't have to cut in the butter. Yet they are still soft and delicious.


Cream Biscuits

Ingredients

3 tablespoons melted butter
2 cups all-purpose flour, plus more for dusting the surface
1 tablespoon baking powder
1/2 teaspoon salt
1 tablespoon sugar (optional)
1 1/2 cups heavy cream

Preheat the oven to 425°F. Line a baking sheet with parchment paper. Sift two cups flour, the baking powder, salt and (if using) sugar into a large bowl. Fold in 1 1/4 cups cream. If the dough is not soft or easily handled, fold in the remaining 1/4 cup cream, little by little.

Turn the dough onto a floured surface, mound it into a ball and, using your hands, gently press it to a thickness of about 3/4 inch. It does not need to be completely smooth across the top. Cut into rounds, 2 1/2 inches in diameter. Gather dough scraps and continue to make rounds. Place the biscuits on a baking sheet lined with parchment paper or a silpat liner. Brush the tops with the butter. Bake until golden, 12 to 15 minutes. Serve immediately, or flash freeze* for future use.

*To flash freeze, place the unbaked biscuits on a lined baking sheet and place in the freezer until completely frozen (about 1-2 hours). Once frozen, the biscuits can carefully be placed in a ziploc bag and removed for baking as needed. Biscuits can be baked straight from the freezer, and additional few minutes baking time will be needed, usually around 3 to 5.

Recipe Source: Mel's Kitchen Cafe

Thursday, June 16, 2011

Divine Breadsticks

I was in the mood for some sort of bread the other night. I am kind of a carb-o-holic. I had already made cookies, but I needed something salty. I settled on these breadsticks and they turned out to be everything I had hoped they would be. The best part about them is that they are quick and simple. Total resting/rise time is only 40 minutes, you can't beat that!


 Divine Breadsticks

 *Makes about 20-25 breadsticks, depending on how thick or thin you cut them (I actually made really long breadsticks so it made about 10 for me).

1 ½ cups warm water
1 tablespoon instant yeast
2 tablespoons sugar
3 ½ cups flour (I usually use a combination of unbleached all-purpose flour and white whole wheat flour but use whatever you have on hand!)
½ teaspoon salt
3 tablespoons butter, melted (for the baking sheet)

Mix all ingredients (except melted butter) in a large bowl or electric mixer and knead for three minutes. Let the dough rest for 10 minutes. Heat oven to 375 degrees. Spread melted butter onto an 11X17-inch baking sheet. Roll out the breadstick dough about 1/4 to 1/2-inch thick and cut into strips with a pizza cutter. Twist slightly if desired and place about 1/2-inch apart on the baking sheet. Sprinkle with garlic salt, herbs of choice (I vary this depending on my mood but it usually consists of rosemary, basil, or thyme in some form and crushed finely) and parmesan cheese. Cover with greased plastic wrap and let rise 30 minutes. Bake 15-20 minutes at 375 degrees until golden brown.

Recipe Source: Mel's Kitchen Cafe