I have been wanting to make this recipe for a long long time. It seems that every time I remember that I want to make it I just don't seem to have the time. The dough itself doesn't take long to make, but it does have to rise and rest for a while. Finally today I decided I just was going to do it. I honestly didn't have any kind of Indian dish planned, but I decided that I love naan and therefore other Indian food is not required for me to make it. I am so glad that I finally made this. I may or may not have eaten just naan for dinner. Don't tell anyone!
Naan - Indian Flatbread
*Makes about 12 pieces of naan
INGREDIENTS:
3-4 cups all-purpose flour
1 teaspoon salt
1/2 teaspoon active dry or instant yeast
1 1/2 cups milk
1 teaspoon sugar
3-4 tablespoons, melted butter
DIRECTIONS:
Pour the milk into a liquid measure and heat in the microwave until warm
to the touch (about 110 degrees F on an instant-read thermometer). If
using active dry yeast, mix the sugar and yeast into the milk and let it
sit for 4-5 minutes until the mixture is foamy and the yeast has
activated. Once the yeast/milk mixture is foamy, pour the mixture into a
large bowl or the bowl of a stand mixer and add the salt and 2 1/2 cups
of the flour (proceed with the second paragraph of the recipe). If
using instant yeast, pour the warm milk into a large bowl or the bowl of
an electric stand mixer. Add the sugar, instant yeast, salt and 2 1/2
cups of the flour. Proceed as directed below.
Mix well to combine. Continue adding flour gradually in small
amounts, until a soft dough is formed that cleans the sides of the bowl.
Knead the dough by mixer or hand until it is smooth and elastic, about
3-5 minutes in the mixer or 10 minutes by hand.
Place the dough in a lightly greased bowl and let it rest at room
temperature, covered lightly with greased plastic wrap, for about 2
hours.
After the dough has rested, turn it onto a lightly floured surface (I
like to use my roul’pat for this) and divide the dough into 12 equal
pieces, rounding each into a ball shape. Cover the pieces with a towel
and let them rest for 30 minutes. While the dough rests, preheat your
oven to 500 degrees F and place a pizza stone on the bottom rack of the
oven. (If you don’t have a pizza stone, try grilling the dough on a
lightly oiled outdoor grill or use a hot griddle to bake the naan –
you’ll have to experiment with cooking times but I’ve seen either of
those methods used with cooking naan also.)
Once the dough has rested for 30 minutes, one by one, roll each piece
into a circle about 6-8 inches wide, depending on how thin or thick you
want your naan. Lay the circle of dough on the hot pizza stone and
spritz lightly with water. Close the oven and bake the naan for 2-4
minutes, until it is lightly puffed (some pieces will puff more than
others) and brown spots begin to appear on the top. Remove the naan from
the baking stone and place on a cooling rack. Brush lightly with melted
butter. I also sprinkled a tiny amount of cracked sea salt on top. If you want to make garlic naan you can use a garlic butter , and sprinkle a small amount of fresh chopped cilantro on top. Stack the hot naan on top of each other as it comes out of the
oven. Cover with a towel and let the naan cool completely or serve warm.
Recipe Source: Mel's Kitchen Cafe
Showing posts with label Yeast. Show all posts
Wednesday, April 11, 2012
Monday, November 21, 2011
Super Simple Pizza Dough
I will be completely honest with all of you. Most days I don't plan what we are going to eat at all. I am always thinking last minute hmmm what should we have for dinner? I know this isn't the best way to be, but for right now it is just how it always seems to end up. Well recipes like this one are a dream come true for me. Granted this dough might not be the absolute best pizza dough ever in life, but for how quick and easy (almost no rising time) it is you can't beat it! This dough is exactly what it sounds like, a very basic dough that is perfect for my last minute pizza cravings. And to be quite honest I really enjoyed the dough (I may or may not have wrapped the dough around some extra mozzarella to make it stuffed crust)
Super Simple Pizza Dough
Yield 1 14-inch thick crust pizza or 2 12-inch thin crust
Ingredients
2 1/2 cups all-purpose flour, or as needed *
1 envelope instant or rapid rise yeast
3/4 teaspoon salt
1 cup very warm water (120 degrees F to 130 degrees F)
2 tablespoons olive or vegetable oil
Cornmeal
Directions
In a large bowl, combine 2 cups flour, undissolved yeast, and salt. Stir very warm water and olive oil into flour mixture. Stir in enough remaining flour to make soft dough. Knead on lightly floured surface until smooth and elastic, about 4 to 6 minutes. Cover; let rest on floured surface 10 minutes.
Lightly oil 1 (14-inch) or 2 (12-inch) round pizza pan(s). Sprinkle with cornmeal. Shape dough into smooth ball. Divide and roll dough to fit desired pan(s). Top pizza as desired. Let rest in a warm place for about 10 minutes prior to baking.
Bake at 400 degrees F for 20 to 30 minutes or until done. Baking time depends on size and thickness of crust and selected toppings.
*For whole wheat pizza dough replace 1 cup of the all-purpose flour with whole wheat flour.
Recipe Source: Allrecipes
Super Simple Pizza Dough
Yield 1 14-inch thick crust pizza or 2 12-inch thin crust
Ingredients
2 1/2 cups all-purpose flour, or as needed *
1 envelope instant or rapid rise yeast
3/4 teaspoon salt
1 cup very warm water (120 degrees F to 130 degrees F)
2 tablespoons olive or vegetable oil
Cornmeal
Directions
In a large bowl, combine 2 cups flour, undissolved yeast, and salt. Stir very warm water and olive oil into flour mixture. Stir in enough remaining flour to make soft dough. Knead on lightly floured surface until smooth and elastic, about 4 to 6 minutes. Cover; let rest on floured surface 10 minutes.
Lightly oil 1 (14-inch) or 2 (12-inch) round pizza pan(s). Sprinkle with cornmeal. Shape dough into smooth ball. Divide and roll dough to fit desired pan(s). Top pizza as desired. Let rest in a warm place for about 10 minutes prior to baking.
Bake at 400 degrees F for 20 to 30 minutes or until done. Baking time depends on size and thickness of crust and selected toppings.
*For whole wheat pizza dough replace 1 cup of the all-purpose flour with whole wheat flour.
Recipe Source: Allrecipes
Wednesday, September 14, 2011
Basic Calzones
This week I have been making freezer meals. Lots and lots of them! It has been fun to just make a bunch of meals on a day off and know that some day in the future I can sit back and relax but still eat a home cooked meal. When trying to figure out what freezer meals to make one of my friends suggested calzones. I thought this was a great idea! I love pizza but this is an easier way to freeze a pizza!
Feel free to use whatever toppings you want. This is a very basic recipe that can be changed and adapted to whatever your likings are.
Basic Calzones
Makes approximately 6-8 medium sized calzones
Dough:
2 1/2 cups warm water
4 teaspoons instant yeast
4 tablespoons sugar
2 tablespoon honey
2 tablespoon olive oil
4 teaspoons salt
3 cups all-purpose flour
3 cups whole wheat flour
Toppings:
2 lbs shredded mozzarella cheese
1 pkg pepperoni
1 jar pizza sauce or spaghetti sauce
Make the dough the night before or early the morning on the day you want to make the pizza. In a large mixing bowl (or in the bowl of a stand mixer), mix the water, yeast, sugar, honey and oil. (If using active dry yeast, increase the amount of yeast to 2 3/4 teaspoons and proof the yeast in the water until foamy before mixing in the sugar, honey and oil.) Then mix in 1 cup flour and the salt. Continue mixing in all the remaining flour until you get a nice, soft dough. Knead until dough is soft and smooth, about 10 minutes by hand or 5 minutes with a stand mixer.
Shape the dough into a ball and place in a lightly greased bowl and cover tightly (with a lid or plastic wrap). Place the dough in the refrigerator to slowly rise until three hours before baking. Three hours before baking, remove the dough from the refrigerator and let it come to room temperature, keeping it lightly covered.
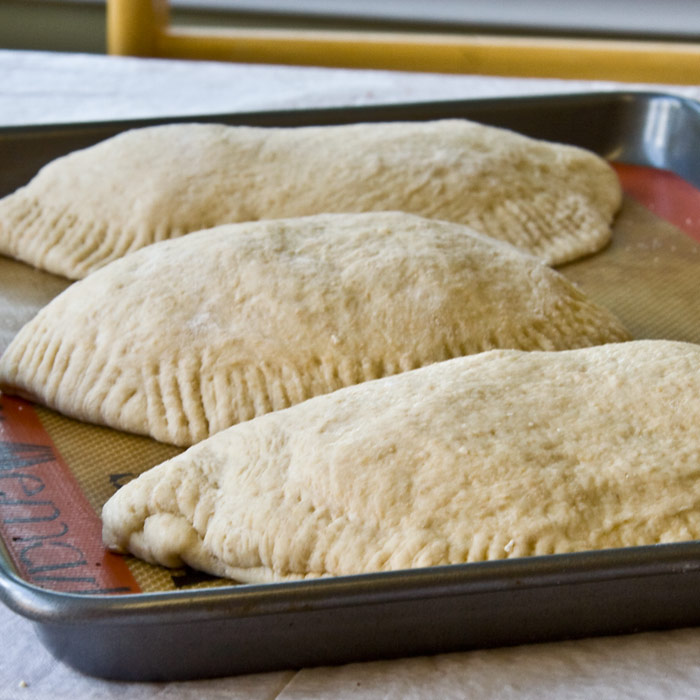
The next day remove dough from fridge about an hour before using. After hour has passed separate dough into 6-8 equal sized pieces. Cover each piece and let rest for about 10 minutes. Using a nonstick mat or a lightly greased counter top, working one at a time, start flattening each piece of dough into a circle.Eventually you’ll want it between six or eight inches in diameter. On the bottom half of the circle spread pizza sauce. Top with cheese and pepperoni (or desired toppings). Grab the top edge of the dough and fold over the toppings. You can stretch the dough if needed to cover entire toppings. Using the tines of a fork, press the edges of the calzone together until well sealed. Carefully lift and place each calzone on a silpat or parchment lined baking sheet.You should be able to fit about 3 moderate sized calzones on each baking sheet. Bake at 400 degrees for 14-15 minutes or until golden brown.
Freezer meal instructions: After calzones are formed place on a baking sheet and place in freezer overnight. Once frozen you can remove from pan and place in zip lock bags and freeze until ready to use. The night before baking place frozen calzones on a greased or silpat lined pan in the fridge to thaw. On baking day take out of fridge 1 hr before baking to bring to room temperature. Once thawed bake as directed above.
Dough recipe source: Mel's Kitchen Cafe
Feel free to use whatever toppings you want. This is a very basic recipe that can be changed and adapted to whatever your likings are.
Basic Calzones
Makes approximately 6-8 medium sized calzones
Dough:
2 1/2 cups warm water
4 teaspoons instant yeast
4 tablespoons sugar
2 tablespoon honey
2 tablespoon olive oil
4 teaspoons salt
3 cups all-purpose flour
3 cups whole wheat flour
Toppings:
2 lbs shredded mozzarella cheese
1 pkg pepperoni
1 jar pizza sauce or spaghetti sauce
Make the dough the night before or early the morning on the day you want to make the pizza. In a large mixing bowl (or in the bowl of a stand mixer), mix the water, yeast, sugar, honey and oil. (If using active dry yeast, increase the amount of yeast to 2 3/4 teaspoons and proof the yeast in the water until foamy before mixing in the sugar, honey and oil.) Then mix in 1 cup flour and the salt. Continue mixing in all the remaining flour until you get a nice, soft dough. Knead until dough is soft and smooth, about 10 minutes by hand or 5 minutes with a stand mixer.
Shape the dough into a ball and place in a lightly greased bowl and cover tightly (with a lid or plastic wrap). Place the dough in the refrigerator to slowly rise until three hours before baking. Three hours before baking, remove the dough from the refrigerator and let it come to room temperature, keeping it lightly covered.
The next day remove dough from fridge about an hour before using. After hour has passed separate dough into 6-8 equal sized pieces. Cover each piece and let rest for about 10 minutes. Using a nonstick mat or a lightly greased counter top, working one at a time, start flattening each piece of dough into a circle.Eventually you’ll want it between six or eight inches in diameter. On the bottom half of the circle spread pizza sauce. Top with cheese and pepperoni (or desired toppings). Grab the top edge of the dough and fold over the toppings. You can stretch the dough if needed to cover entire toppings. Using the tines of a fork, press the edges of the calzone together until well sealed. Carefully lift and place each calzone on a silpat or parchment lined baking sheet.You should be able to fit about 3 moderate sized calzones on each baking sheet. Bake at 400 degrees for 14-15 minutes or until golden brown.
Freezer meal instructions: After calzones are formed place on a baking sheet and place in freezer overnight. Once frozen you can remove from pan and place in zip lock bags and freeze until ready to use. The night before baking place frozen calzones on a greased or silpat lined pan in the fridge to thaw. On baking day take out of fridge 1 hr before baking to bring to room temperature. Once thawed bake as directed above.
Dough recipe source: Mel's Kitchen Cafe
Monday, September 5, 2011
Macaroni Grill Bread
I love bread! If a restaurant serves bread before the meal I am usually more excited to eat the bread than anything else. I don't know if it is just the fact that I am usually really hungry when they bring the bread out, or if the bread really is just amazing. Either way I love going to places that serve amazing bread. This restaurant is the same. I always love eating their bread. My mom actually gave me this recipe. She had it at a friends house and raved about it so much that I just had to get the recipe. This recipe really does come pretty close to the real thing, if I could only find some opera singer to come sing in my kitchen!
Macaroni Grill Bread
Yield: 2 loaves
Time: 1 1/2 hours start to finish
Ingredients:
1 1/2 t active dry yeast
1 C warm water
3 T olive oil
1/4 t sugar
2 1/2 C flour
1 1/2 t salt
1/4 t McCormick Italian Seasoning Grinder
1/4 t cracked black pepper
3/4 T fresh rosemary, snipped
1 egg
butter and salt
1. In the bottom of your mixer combine water, yeast and sugar. Mix it around a bit with a spoon and let it sit for 5 minutes.
2. Add the salt, oil and 1 C flour. Mix for 30 seconds to incorporate.
3. Add the rest of the flour about 1/2 C at a time, while the mixer continues to mix.
4. When all of the flour is incorporated mix on high for about 7 minutes.
5. While your mixer is doing it's fine work, get your herbs and seasonings ready to go. I like to snip rosemary with scissors. You don't want to eat any of the thick stem that rosemary comes on, only the little needles.
6. When your dough is done mixing add the rosemary, pepper and Italian seasoning. Mix just until incorporated.
7. Cover your mixing bowl with a kitchen towel and let it rise for about 40 minutes, or until doubled in size.
8. Divide the dough into 2 parts. Shape into balls and place on a sprayed cookie sheet, or a cooking stone with a bit of olive oil on it.
9. Spray a sharp knife with cooking spray and cut 2 slits in the top of the bread.
10. In a small bowl whisk an egg until frothy. Brush the egg all over the top of the loaf and into the cracks.
11. Place the loaves into a warm oven. (I set mine to 170) Let them rise until doubled in size, about 15 minutes.
12. Turn your oven up to 370 degrees and bake for about 20 minutes, or until golden brown.
13. When the loaves come out of the oven, place them on a cooling rack. Brush butter over the tops and sprinkle a little bit of salt over the top of the butter. Be careful to not get too much. I always use freshly cracked salt. You can buy both salt and pepper crackers at Costco these days. Look on the spice aisle.
Recipe Source: Jamie Cooks It Up!
Macaroni Grill Bread
Yield: 2 loaves
Time: 1 1/2 hours start to finish
Ingredients:
1 1/2 t active dry yeast
1 C warm water
3 T olive oil
1/4 t sugar
2 1/2 C flour
1 1/2 t salt
1/4 t McCormick Italian Seasoning Grinder
1/4 t cracked black pepper
3/4 T fresh rosemary, snipped
1 egg
butter and salt
1. In the bottom of your mixer combine water, yeast and sugar. Mix it around a bit with a spoon and let it sit for 5 minutes.
2. Add the salt, oil and 1 C flour. Mix for 30 seconds to incorporate.
3. Add the rest of the flour about 1/2 C at a time, while the mixer continues to mix.
4. When all of the flour is incorporated mix on high for about 7 minutes.
5. While your mixer is doing it's fine work, get your herbs and seasonings ready to go. I like to snip rosemary with scissors. You don't want to eat any of the thick stem that rosemary comes on, only the little needles.
6. When your dough is done mixing add the rosemary, pepper and Italian seasoning. Mix just until incorporated.
7. Cover your mixing bowl with a kitchen towel and let it rise for about 40 minutes, or until doubled in size.
8. Divide the dough into 2 parts. Shape into balls and place on a sprayed cookie sheet, or a cooking stone with a bit of olive oil on it.
9. Spray a sharp knife with cooking spray and cut 2 slits in the top of the bread.
10. In a small bowl whisk an egg until frothy. Brush the egg all over the top of the loaf and into the cracks.
11. Place the loaves into a warm oven. (I set mine to 170) Let them rise until doubled in size, about 15 minutes.
12. Turn your oven up to 370 degrees and bake for about 20 minutes, or until golden brown.
13. When the loaves come out of the oven, place them on a cooling rack. Brush butter over the tops and sprinkle a little bit of salt over the top of the butter. Be careful to not get too much. I always use freshly cracked salt. You can buy both salt and pepper crackers at Costco these days. Look on the spice aisle.
Recipe Source: Jamie Cooks It Up!
Wednesday, August 17, 2011
Garlic Knots
I love garlic. I think I get it from my dad. It is just such a wonderful thing on most types of savory dishes. The first time I experience garlic knots was at a pizza place in Park City Utah. The dough was soft and tender, and the garlic was in abundance on those bad boys. It takes a lot of garlic for me to say that it was too much garlic, but if anything has come close they did. Now don't get me wrong they were fantastic and I might have wanted to eat them more than my pizza, but I knew if I were to make them for myself I would put a little less garlic on them. It has been about a year or so since that experience and recently I ran into this recipe and decided that I had to try them. I combined a little of what they did at the restaurant with this already amazing recipe and had fantastic results.
Garlic Knots
1 1/2 cups warm water
3/4 tablespoon instant yeast (or 1 tablespoon active dry yeast)
2 tablespoons granulated sugar
2 tablespoons canola oil
1 teaspoon salt
4 cups all-purpose flour, give or take a few tablespoons
4-6 garlic cloves finely minced or pressed through a garlic press
4 tablespoons butter, melted
Parmesan cheese
Dried parsley flakes
In the bowl of a stand mixer or in a large bowl by hand, combine the warm water, yeast, sugar, oil, salt and 2 cups of the flour (if you are using active dry yeast instead of instant yeast, let the yeast proof in the warm water and sugar for about 3-5 minutes until it is foamy and bubbly before adding the oil, salt and flour). Begin mixing and continue to add the rest of the flour gradually until the dough has pulled away from the sides of the bowl. Judge the dough not by the amount of flour called for in the recipe but in how the dough feels. The dough should be soft and smooth but still slightly tacky to the touch.
Knead the dough in the stand mixer or by hand until it is very smooth and elastic, about 5 minutes in a stand mixer or 8-10 minutes by hand. Lightly spray a large bowl with cooking spray and place the dough in the bowl. Cover the bowl with lightly greased plastic wrap. Let the dough rise until it has doubled (this usually takes about an hour). While dough is rising melt butter and add garlic.
Lightly punch down the dough and turn it out onto a lightly greased counter top. Divide the dough into 12 equal pieces and roll each piece into a four to six-inch rope. Brush rope with garlic butter making sure to get a few small pieces of garlic on each rope. Form into a knot, tucking the loose ends into the center of the knot. Place the rolls on a lightly greased or silpat-lined baking sheet about an inch or two apart. Cover the rolls with lightly greased plastic wrap taking care not to pin the plastic wrap under the baking sheet or else the rolls will flatten while rising. Let the plastic wrap gently hang over the sides of the pan to fully cover the rolls but not press them down. Let the rolls rise until doubled, about 45 minutes.
Preheat the oven to 400 degrees. Bake for 12-14 minutes until lightly browned and cooked through. Brush each roll with extra garlic butter (you might have to make more depending on how much you put on your rolls prior to baking) and sprinkle with parmesan cheese and parsley flakes (mostly just for color). Return to oven for another minute if you want your parmesan melted on top.
Recipe Source:Adapted slightly from Mel's Kitchen Cafe
Garlic Knots
1 1/2 cups warm water
3/4 tablespoon instant yeast (or 1 tablespoon active dry yeast)
2 tablespoons granulated sugar
2 tablespoons canola oil
1 teaspoon salt
4 cups all-purpose flour, give or take a few tablespoons
4-6 garlic cloves finely minced or pressed through a garlic press
4 tablespoons butter, melted
Parmesan cheese
Dried parsley flakes
In the bowl of a stand mixer or in a large bowl by hand, combine the warm water, yeast, sugar, oil, salt and 2 cups of the flour (if you are using active dry yeast instead of instant yeast, let the yeast proof in the warm water and sugar for about 3-5 minutes until it is foamy and bubbly before adding the oil, salt and flour). Begin mixing and continue to add the rest of the flour gradually until the dough has pulled away from the sides of the bowl. Judge the dough not by the amount of flour called for in the recipe but in how the dough feels. The dough should be soft and smooth but still slightly tacky to the touch.
Knead the dough in the stand mixer or by hand until it is very smooth and elastic, about 5 minutes in a stand mixer or 8-10 minutes by hand. Lightly spray a large bowl with cooking spray and place the dough in the bowl. Cover the bowl with lightly greased plastic wrap. Let the dough rise until it has doubled (this usually takes about an hour). While dough is rising melt butter and add garlic.
Lightly punch down the dough and turn it out onto a lightly greased counter top. Divide the dough into 12 equal pieces and roll each piece into a four to six-inch rope. Brush rope with garlic butter making sure to get a few small pieces of garlic on each rope. Form into a knot, tucking the loose ends into the center of the knot. Place the rolls on a lightly greased or silpat-lined baking sheet about an inch or two apart. Cover the rolls with lightly greased plastic wrap taking care not to pin the plastic wrap under the baking sheet or else the rolls will flatten while rising. Let the plastic wrap gently hang over the sides of the pan to fully cover the rolls but not press them down. Let the rolls rise until doubled, about 45 minutes.
Preheat the oven to 400 degrees. Bake for 12-14 minutes until lightly browned and cooked through. Brush each roll with extra garlic butter (you might have to make more depending on how much you put on your rolls prior to baking) and sprinkle with parmesan cheese and parsley flakes (mostly just for color). Return to oven for another minute if you want your parmesan melted on top.
Recipe Source:Adapted slightly from Mel's Kitchen Cafe
Friday, August 12, 2011
French Bread
I am a carb-o-holic. I have admitted this before and if you see most of the things that I post this fact is very evident. The smell of fresh baked bread is one of my favorite smells. Really if I were a candle maker I would be working hard to try and make a candle that actually smelled like baking bread. The only thing I love more that the smell of fresh baked bread is eating it. Taking a nice big slice of warm bread and eating it with or without butter and homemade jam is seriously a small slice of heaven to me!
I have been wanting to make this french bread for a few days now. I ended up getting a headache and what should one do when they have a headache? Well naturally I went for a short run, took a hot shower, and made bread. My favorite part of this was obviously the bread! This bread is so basic yet the taste and texture of it are so amazing. The egg wash makes it slightly crispy on the outside and oh so soft and chewy on the inside. This is definitely a recipe I am going to be making again and again.
*Note: as with all yeast doughs, I never use the flour amount called for in the recipe as a hard fast rule (unless a weight measure is given and then I pull out my kitchen scale). Because humidity, temperature, altitude and a multitude of other factors can impact how much flour you need in your yeast doughs, I always judge when to quit adding flour by the texture and look and feel of the dough rather than how much flour I’ve added compared to the recipe.
2 ¼ c. warm water
2 T. sugar
1 Tbsp yeast
1 Tbsp salt
2 Tbsp oil
5 ½ -6 cups flour-stirred before measured
Dissolve sugar and yeast in the warm water. Let this proof—or sit for a few minutes until it bubbles. Then add salt, oil and 3 cups of flour and beat well. Add in 2 1/2 -3 more cups of flour. The dough should clean off the sides of the bowl and not be too stick – but be careful not to add too much flour. Knead for a few minutes.
Leave the dough in the mixer to rest for 10 minutes and then stir it down (turn on your mixer for 10 seconds) and then allow to rest another 10 minutes. Repeat for a total of 5 times. Then turn dough onto a floured surface and divide into two equal parts. Roll each part into a 9×13 rectangle. Roll dough up, starting from long edge of loaf to seal. Arrange seam side down on large baking sheet that’s been sprinkled with corn meal, allowing room for both loaves. Repeat with second part of dough. With a sharp knife, cut 3 gashes at an angle on the top of each. Cover lightly; allow to rise 30 minutes. Brush entire surface with egg wash (one egg beaten slightly with 1 Tbsp of water). If desired, sprinkle with sesame seeds. Bake for 30 minutes at 375 degrees.
Recipe Source: Mel's Kitchen Cafe
I have been wanting to make this french bread for a few days now. I ended up getting a headache and what should one do when they have a headache? Well naturally I went for a short run, took a hot shower, and made bread. My favorite part of this was obviously the bread! This bread is so basic yet the taste and texture of it are so amazing. The egg wash makes it slightly crispy on the outside and oh so soft and chewy on the inside. This is definitely a recipe I am going to be making again and again.
*Note: as with all yeast doughs, I never use the flour amount called for in the recipe as a hard fast rule (unless a weight measure is given and then I pull out my kitchen scale). Because humidity, temperature, altitude and a multitude of other factors can impact how much flour you need in your yeast doughs, I always judge when to quit adding flour by the texture and look and feel of the dough rather than how much flour I’ve added compared to the recipe.
2 ¼ c. warm water
2 T. sugar
1 Tbsp yeast
1 Tbsp salt
2 Tbsp oil
5 ½ -6 cups flour-stirred before measured
Dissolve sugar and yeast in the warm water. Let this proof—or sit for a few minutes until it bubbles. Then add salt, oil and 3 cups of flour and beat well. Add in 2 1/2 -3 more cups of flour. The dough should clean off the sides of the bowl and not be too stick – but be careful not to add too much flour. Knead for a few minutes.
Leave the dough in the mixer to rest for 10 minutes and then stir it down (turn on your mixer for 10 seconds) and then allow to rest another 10 minutes. Repeat for a total of 5 times. Then turn dough onto a floured surface and divide into two equal parts. Roll each part into a 9×13 rectangle. Roll dough up, starting from long edge of loaf to seal. Arrange seam side down on large baking sheet that’s been sprinkled with corn meal, allowing room for both loaves. Repeat with second part of dough. With a sharp knife, cut 3 gashes at an angle on the top of each. Cover lightly; allow to rise 30 minutes. Brush entire surface with egg wash (one egg beaten slightly with 1 Tbsp of water). If desired, sprinkle with sesame seeds. Bake for 30 minutes at 375 degrees.
Recipe Source: Mel's Kitchen Cafe
Wednesday, June 29, 2011
Soft Pretzel Dogs
I love hot dogs. I have always loved hot dogs. As a child I actually didn't like hamburgers so if we ever went to a fast food place my mom would have to take us somewhere that had hot dogs or else I wouldn't eat anything. My love for hot dogs caries over to all realms of hot dogs. I love hot dogs on a bun, in mac n cheese, corn dogs, pigs in a blanket, and newly added to my list are these soft pretzel dogs! In my last post for homemade soft pretzels I mentioned I would be doing something else with the dough. I wish I could say I thought of this ingenious idea myself, but I didn't. I found this recipe over at Katrina's Kitchen and knew I had to try it. I also need to put a plug in for good hot dogs. There are a million different types of hot dogs out there, but not all hot dogs were made equal. Yes you might be able to get some cheap hot dogs for practically nothing, in fact the store might actually pay you to take them but who knows what is in them! My absolute favorite type of hot dog is Nathan's, and my absolute favorite kind of Nathan's hot dogs are the cheddar dogs. Now if you have had cheese dogs before and didn't like them don't rule these ones out quite yet. They don't have a strong cheese taste, but they have just enough to make them delicious! The best part about Nathan's is that they are all beef. They are kinda pricey (as far as hot dogs are concerned) but to me they are worth the cost!
Soft Pretzel Dogs (I actually halved this recipe and it was enough for 2 dogs, a full size pretzel, and several bites)
* I halved this recipe, but I still used the full amount of water and baking soda mixture and it worked out perfect.
Soft Pretzel Dogs (I actually halved this recipe and it was enough for 2 dogs, a full size pretzel, and several bites)
Ingredients:
· 1 package active dry yeast (approx. 2 ¼ teaspoons)
· 2 Tablespoons brown sugar
· 1 ¼ teaspoons salt
· 1 ½ cups warm water (110- 115 degrees F)
· 4 cups flour
· 6 cups water
· 6 tablespoons baking soda
· 2 – 3 Tablespoons melted butter
· Coarse Kosher Salt (optional)
Directions:
1. In the bowl of your mixer (fitted with dough hook) dissolve yeast, brown sugar and salt in 1 1/2 cups warm water. Mix in flour until you can turn your dough on a floured surface. Knead until smooth and elastic, 6-8 minutes. Place in a greased bowl. Cover, and let rise for one hour. Punch down dough and cover with saran wrap. Place in fridge and let rest over night. (This step is optional, I ran out of time and made them the next day but they turned out so amazing!
2. The next day take dough out of fridge, cut into 12 pieces. Let the dough rest for 5 minutes. Roll each piece into a 2-3 foot rope.
3. In a large saucepan, bring water and baking soda to a simmer over medium heat.
4. Roll your dough around the hot dogs and dip into the baking soda solution for about 20-30 seconds. Place on parchment covered (or greased) baking sheets, and let rise 15-20 minutes.
5. You could certainly roll your pretzel dough into any shape at this point. I had 6 hot dogs and made the rest into pretzel bites. 6. Bake at 450 degrees F (230 degrees C) for 8 -10 minutes, or until golden brown. Brush with melted butter and sprinkle with sea salt.
* I halved this recipe, but I still used the full amount of water and baking soda mixture and it worked out perfect.
Wednesday, June 22, 2011
Soft Pretzel Bites
Do you ever decide to make something and during the process you are really wondering if it is going to turn out like you hope? You then take your first bite of whatever it is and realize it is even better than you imagined! That is how this recipe went for me. I was curious, they looked good, why not make them? My husband and I were able to polish off practically the whole batch of these bad boys without even thinking about it. On my next post I will show you what else I did with this recipe, but for now enjoy these amazing homemade pretzels!
This recipe is slightly adapted from a recipe I found over at Katrina's Kitchen who got the recipe from Allrecipes
Ingredients:
· 1 package active dry yeast (approx. 2 ¼ teaspoons)
· 2 Tablespoons brown sugar
· 1 ¼ teaspoons salt
· 1 ½ cups warm water (110- 115 degrees F)
· 4 cups flour
· 6 cups water
· 6 tablespoons baking soda
· 2 – 3 Tablespoons melted butter
· Coarse Kosher Salt (optional)
Directions:
1. In the bowl of your mixer (fitted with dough hook) dissolve yeast, brown sugar and salt in 1 1/2 cups warm water. Mix in flour until you can turn your dough on a floured surface. Knead until smooth and elastic, 6-8 minutes. Place in a greased bowl. Cover, and let rise for one hour. Punch down dough and cover with saran wrap. Place in fridge and let rest over night. (This step is optional, I ran out of time and made them the next day but they turned out so amazing!
2. The next day take dough out of fridge, cut into 12 pieces. Let the dough rest for 5 minutes. Roll each piece into a 2-3 foot rope.
3. In a large saucepan, bring water and baking soda to a simmer over medium heat.
4. Cut dough ropes into bite size pieces and drop into the baking soda solution a few at a time and let simmer for about 20-30 seconds. I found that using a slotted spoon to get them out worked quite well. Place on silpat covered (or greased) baking sheets, and let rise 15-20 minutes.
5. You could certainly roll your pretzel dough into any shape prior to putting them in the boiling water. I made one into a full size soft pretzel, but it didn't look nearly as pretty as I wanted it to so I stuck mostly with the bites.6. Bake at 450 degrees F (230 degrees C) for 8 -10 minutes, or until golden brown. Brush with melted butter and sprinkle with coarse sea salt.
This recipe is slightly adapted from a recipe I found over at Katrina's Kitchen who got the recipe from Allrecipes
Thursday, June 16, 2011
Divine Breadsticks
I was in the mood for some sort of bread the other night. I am kind of a carb-o-holic. I had already made cookies, but I needed something salty. I settled on these breadsticks and they turned out to be everything I had hoped they would be. The best part about them is that they are quick and simple. Total resting/rise time is only 40 minutes, you can't beat that!
Divine Breadsticks
*Makes about 20-25 breadsticks, depending on how thick or thin you cut them (I actually made really long breadsticks so it made about 10 for me).
1 ½ cups warm water
1 tablespoon instant yeast
2 tablespoons sugar
3 ½ cups flour (I usually use a combination of unbleached all-purpose flour and white whole wheat flour but use whatever you have on hand!)
½ teaspoon salt
3 tablespoons butter, melted (for the baking sheet)
Mix all ingredients (except melted butter) in a large bowl or electric mixer and knead for three minutes. Let the dough rest for 10 minutes. Heat oven to 375 degrees. Spread melted butter onto an 11X17-inch baking sheet. Roll out the breadstick dough about 1/4 to 1/2-inch thick and cut into strips with a pizza cutter. Twist slightly if desired and place about 1/2-inch apart on the baking sheet. Sprinkle with garlic salt, herbs of choice (I vary this depending on my mood but it usually consists of rosemary, basil, or thyme in some form and crushed finely) and parmesan cheese. Cover with greased plastic wrap and let rise 30 minutes. Bake 15-20 minutes at 375 degrees until golden brown.
Recipe Source: Mel's Kitchen Cafe
Divine Breadsticks
*Makes about 20-25 breadsticks, depending on how thick or thin you cut them (I actually made really long breadsticks so it made about 10 for me).
1 ½ cups warm water
1 tablespoon instant yeast
2 tablespoons sugar
3 ½ cups flour (I usually use a combination of unbleached all-purpose flour and white whole wheat flour but use whatever you have on hand!)
½ teaspoon salt
3 tablespoons butter, melted (for the baking sheet)
Mix all ingredients (except melted butter) in a large bowl or electric mixer and knead for three minutes. Let the dough rest for 10 minutes. Heat oven to 375 degrees. Spread melted butter onto an 11X17-inch baking sheet. Roll out the breadstick dough about 1/4 to 1/2-inch thick and cut into strips with a pizza cutter. Twist slightly if desired and place about 1/2-inch apart on the baking sheet. Sprinkle with garlic salt, herbs of choice (I vary this depending on my mood but it usually consists of rosemary, basil, or thyme in some form and crushed finely) and parmesan cheese. Cover with greased plastic wrap and let rise 30 minutes. Bake 15-20 minutes at 375 degrees until golden brown.
Recipe Source: Mel's Kitchen Cafe
Subscribe to:
Posts (Atom)