Thursday, June 16, 2011

Divine Breadsticks

I was in the mood for some sort of bread the other night. I am kind of a carb-o-holic. I had already made cookies, but I needed something salty. I settled on these breadsticks and they turned out to be everything I had hoped they would be. The best part about them is that they are quick and simple. Total resting/rise time is only 40 minutes, you can't beat that!


 Divine Breadsticks

 *Makes about 20-25 breadsticks, depending on how thick or thin you cut them (I actually made really long breadsticks so it made about 10 for me).

1 ½ cups warm water
1 tablespoon instant yeast
2 tablespoons sugar
3 ½ cups flour (I usually use a combination of unbleached all-purpose flour and white whole wheat flour but use whatever you have on hand!)
½ teaspoon salt
3 tablespoons butter, melted (for the baking sheet)

Mix all ingredients (except melted butter) in a large bowl or electric mixer and knead for three minutes. Let the dough rest for 10 minutes. Heat oven to 375 degrees. Spread melted butter onto an 11X17-inch baking sheet. Roll out the breadstick dough about 1/4 to 1/2-inch thick and cut into strips with a pizza cutter. Twist slightly if desired and place about 1/2-inch apart on the baking sheet. Sprinkle with garlic salt, herbs of choice (I vary this depending on my mood but it usually consists of rosemary, basil, or thyme in some form and crushed finely) and parmesan cheese. Cover with greased plastic wrap and let rise 30 minutes. Bake 15-20 minutes at 375 degrees until golden brown.

Recipe Source: Mel's Kitchen Cafe


Monday, June 13, 2011

Unbelievable Chocolate Cake With Raspberry Filling

My husband's birthday was this last weekend and I spent the few weeks before trying to figure out the perfect combination of flavors for his cake. My husband loves a slight almond flavor in his frosting, he also loves chocolate, and I decided that I wanted to also have a raspberry filling (mostly cause I love raspberry filling). I didn't know exactly how all of this would taste together but I decided to go for it. The cake was really fun to make and it turned out really yummy too. The most important part was that he loved it!
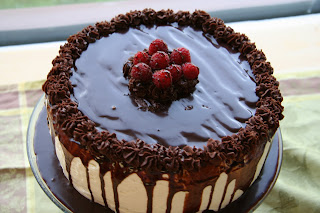


Unbelievable Chocolate Cake

1 ¼ cups unsweetened cocoa powder
2 ½ cups all purpose flour
2 ½ cups sugar
2 ½ teaspoons baking soda
1 ¼ teaspoons baking powder
1 ¼ teaspoons salt
2 large eggs plus 1 large egg yolk
1 ¼ cups warm water
1 ¼ cups buttermilk
½ cup plus 2 tablespoons vegetable oil
1 ½ teaspoons pure vanilla extract

Preheat the oven to 350 degrees, making sure the baking rack is in the middle of the oven. Prepare your cake pans by cutting out a piece of parchment or wax paper to line the bottom of the pan. Grease the pans, place the parchment or wax paper in the bottom of the pan and lightly grease again. Dust the pans with flour (or cocoa powder if you don’t want the white dusting on the finished cakes). Set the pans aside.

Using a fine mesh strainer, sift together the cocoa, flour, sugar, baking soda, baking powder, and salt into a large bowl. Add the eggs, yolk, warm water, buttermilk, oil and vanilla. Mix on low speed (with a handheld mixer or in the bowl of an electric stand mixer) until smooth, about 3 minutes.

Divide the batter evenly between the prepared pans. Do not over fill the pans it will overflow in the oven.  Bake the cakes for about 32-35 minutes, until a toothpick inserted into the middle comes out clean or with moist crumbs. Do not over bake! Remove the pans from the oven and set the pans on a wire rack to cool for 15 minutes. Gently run a thin knife around the edges of the pans and  unmold the cakes, removing the parchment paper liners from the bottom of the cakes. Let them cool completely, top sides ups, on a wire rack. Trim the tops of the cake layers with a long serrated knife to make them level. Spread raspberry filling in center (recipe to follow or for a shortcut you could use a raspberry jam) and frost as desired. I used a delicious frosting that worked well with the flavors, but is not as sturdy as your typical butter cream frosting.


Raspberry Filling

16 oz. frozen raspberries, thawed
1/3 cup sugar
3 tbsp. cornstarch
1 tsp. lemon juice

To make the raspberry filling, drain the thawed berries, reserving the juice in a liquid measuring cup. Add enough water so that the total liquid equals 1¼ cups. Add the liquid to a medium saucepan with the sugar and cornstarch. Heat over medium-high heat, whisking occasionally, until the mixture begins to bubble and thicken. Continue whisking so no lumps form. Once thickened, remove from the heat and whisk in the lemon juice. Fold in the drained berries with a spatula. Cover and chill until ready to use. (The filling will continue to thicken as it chills.)


Magic Frosting

1 1/2 cups granulated sugar
1/4 cup all-purpose flour
3 tablespoons cornstarch
1/4 teaspoon salt
1 1/2 cups milk (I used 1% with stellar results)
1 1/2 teaspoons pure vanilla extract
1/2 teaspoon almond extract
24 tablespoons (3 sticks) butter, cut into 24 pieces and softened at room temperature

In a medium bowl, combine the sugar, flour, cornstarch and salt. Slowly whisk in the milk until the mixture is smooth. Place a fine-mesh strainer over a medium saucepan and pour the milk mixture through the strainer into the saucepan. Cook the mixture over medium heat, whisking constantly, until the mixture boils and is thick enough that it starts to become difficult to easily whisk. This could take anywhere between 5-10 minutes, depending on your stove, heat, etc. It should bubble quite a bit at the end (be careful of the splatters) and thicken considerably.

Transfer the mixture to a clean bowl and cool to room temperature – this is extremely important! If it is even slightly warm, the frosting won’t beat up properly. I refrigerated my initial mixture overnight. If you do this, make sure to pull it out in time to let it warm back up to room temperature. If you try to proceed with the rest of the recipe and the mixture is too cold, the butter won’t absorb into the frosting like it should.

Once the frosting is completely cooled to room temperature (it should have no hint of warmth at all!), beat the mixture with the vanilla on low speed until it is well combined, about 30 seconds (a stand mixer will work best for this). Add the butter, one piece at a time, and beat the frosting until all the butter has been incorporated fully, about 2 minutes. Increase the speed to medium-high and let the mixer work it’s magic. Beat the frosting for five minutes, until it is light and fluffy. Let the frosting sit at room temperature until it is a bit more stiff, about 1 hour.

Ganache

8 oz. bittersweet chocolate, finely chopped
1 cup heavy cream
3 tbsp. unsalted butter, at room temperature

To make the ganache, place the chopped chocolate in a heatproof bowl. Heat the cream in a saucepan and bring to a simmer. Immediately remove from the heat and pour the hot cream over the chopped chocolate. Let stand 1-2 minutes, then whisk together until a smooth, thick ganacheganache sit to thicken a bit so that it is suitable for spreading and piping. You can use some of this ganache in a pastry bag fitted with a plain round tip. You can pipe a small amount around the top edge on your bottom layer to help keep filling in.

Chocolate Glaze

4 oz. bittersweet chocolate, finely chopped
½ cup heavy whipping cream
¼ cup light corn syrup
2 tsp. vanilla extract

To make the chocolate glaze, place the chocolate in a medium bowl. Heat the cream in a small saucepan over medium heat until simmering. Pour the hot cream over the chocolate and let sit 1-2 minutes. Whisk until the mixture is smooth and homogeneous. Blend in the corn syrup and vanilla. Pour the glaze into a pitcher or measuring cup and let cool for 10 minutes. (Do not let the glaze cool longer or it may become difficult to pour over the cake.) Slowly pour the glaze over the cake, ensuring that the top is covered and the glaze drips over the sides. Let the glaze set about 5-10 minutes. Meanwhile, bring the remaining reserved ganache to a consistency for piping. (You can microwave in 5 second intervals on low power – it won’t take long to rewarm. If you overshoot and the ganache becomes too thin, simply chill again in the fridge or freezer until it is thick enough to pipe.) Transfer the ganache to a pastry bag fitted with a decorative tip. Pipe swirls of ganache around the edge of the top of the cake and top each swirl with a fresh raspberry. Chill the cake until ready to serve. 

Recipe Sources: Cake - Mel's Unbelievable Chocolate Cake, Frosting - Mel's Magical Frosting, Raspberry Filling, Ganache, and Chocolate glaze - Annies Eats

Friday, June 10, 2011

Buttermilk Syrup

There is no question as to what my favorite meals are. I have a serious love hate relationship with sugar. Therefore my two favorite meals are breakfast and dessert (yes dessert is a meal just in case you didn't know that).  Years ago I went to this local restaurant that serves delicious breakfast. They have this amazing syrup that I fell in love with instantly. I knew that I needed to figure out how to make it. After searching the web and combining recipes this is what I have come up with.


Buttermilk Syrup

1 1/2 cups white sugar
3/4 cup buttermilk
1/2 cup butter
1 cup corn syrup
1 tsp baking soda
2 tsp vanilla (optional)

In a very large saucepan stir together all the ingredients except baking soda. Bring to a boil. Add Baking soda and cook for 7 minutes. Once the baking soda is added the syrup will foam up quite a bit so make sure you are using a very large saucepan. Remove from heat and serve.

Thursday, June 9, 2011

Peanut Butter Brownie Trifle


This last weekend was my husband's birthday. I made him a traditional cake on his birthday, but we have lots of family that lives close by (which we love); therefore I had more than one opportunity to make him a yummy treat. When I saw this recipe I knew that it would be perfect for a birthday dessert. Both my husband and I love chocolate and peanut butter together, add a few Reese's peanut butter cups (or a lot of them) and we are very happy people.

I mean who could resist all those peanut butter cups?


Peanut Butter Brownie Trifle

1 9X13 pan of your favorite brownie recipe
10 ounce bag of peanut butter chips
5 ounce package vanilla instant pudding mix
3 cups milk
1/2 cup peanut butter, creamy
2 teaspoons vanilla extract
1 cup whipping cream, whipped and divided
24 regular sized (about 2 inches in diameter) peanut butter cups, divided

Line a 13 by 9 inch pan with aluminum foil, extend foil by 2 inches over side. Grease lightly with cooking spray. Prepare brownies according to the recipe. Add peanut butter chips. Bake in foil lined pan for length of time required. Cool completely.

Lift foil out of pan. Invert on cutting board. Remove foil. Cut into 3/4 inch pieces, using sharp knife.

Coarsely chop peanut butter cups; 1/4 cup for garnish.

Combine pudding mix and milk in large bowl. Beat at low speed for 2 minutes or until thickened (I had to chill mine for about 5 minutes to thicken it completely). Add peanut butter and vanilla; beat until smooth. Gently fold in half of whipped cream.

Place half of brownies in bottom of trifle bowl; top with 1/2 of chopped candy and half of pudding. Repeat layers. Top with remaining whipped cream, spooned or piped on. Garnish top with remaining peanut butter cups.


Recipe Source: Mel's Kitchen Cafe

Tuesday, June 7, 2011

Delicious Bran Muffins

I actually love bran muffins. They are hearty and filling, yet sweet and soft. I realized my love for bran muffins years ago while at one of my friend's grandmother's house in Canada. She is basically famous for her bran muffins. I can honestly say that that was the first time I had bran muffins I really enjoyed. I have since tried many many recipes, most of which were really good, but had a different flavor that I was used to or was searching for. I wanted a recipe that actually used wheat bran, not just a cereal that had bran in it. I found this recipe online and have loved it ever since!


Delicious Bran Muffins

1 1/2 cups wheat bran
1 cup buttermilk
1/2 cup butter melted
1 egg
2/3 cup brown sugar
1/2 teaspoon vanilla extract
1 cup all-purpose flour
1 teaspoon baking soda
1 teaspoon baking powder
1/2 teaspoon salt
1/2 cup raisins (optional - I opt out)


Directions
Preheat oven to 375 degrees F (190 degrees C). Grease muffin cups or line with paper muffin liners.
Mix together wheat bran and buttermilk; let stand for 10 minutes.
Beat together oil, egg, sugar and vanilla and add to buttermilk/bran mixture. Sift together flour, baking soda, baking powder and salt. Stir flour mixture into buttermilk mixture, until just blended. Fold in raisins and spoon batter into prepared muffin tins.
Bake for 15 to 20 minutes, or until a toothpick inserted into the center of a muffin comes out clean. Cool and enjoy!

Recipe Source:Adapted from Allrecipes

Thursday, June 2, 2011

The Perfect Cookies With Reece's Pieces


My husband reminded me the other day that we have a lot of Reece's Pieces. They are actually kind of a staple around our house. My husband has a gum ball machine that is filled with them. He suggested that I should make something with the Reece's pieces. He then recommended cookies. I thought to myself I already have the Perfect Chocolate Chip Cookie recipe, why not just replace the chocolate chips with Reece's Pieces. That is exactly what I did and they are AMAZING!  The Reece's Pieces give such a nice nutty flavor to the already amazing cookies. If you have some Reece's Pieces lying around (or if you find them lying around at the store) you should definitely try these out!

The Perfect Cookie + Reece's Pieces 

Instructions: Follow the recipe for the Perfect Chocolate Chip Cookie except when you come to the part where you add chocolate chips add 1 cup Reece's Pieces instead. Shape into a slightly larger than normal ball of cookie dough. Bake as directed and enjoy! (I of course left out the nuts on this one as well, sorry not a nut person).

Wednesday, June 1, 2011

Potato Bread


I have always loved potato rolls. A week or so ago a friend of mine gave me a really yummy recipe for potato rolls. The rolls are amazing but its a huge recipe. I decided to make some of it into a loaf and have loved the results. The bread is soft, yet still stays together. I have loved eating sandwiches on it all week. My favorite thus far has been peanut butter and honey (yes I'm still a kid at heart).

Potato Bread

10-11 cups flour (approximately)
2 tbs instant yeast
4 1/2 tsp salt
1 cup sugar
1/2 cup instant potato flakes (Idaho)
2 cups hot milk (hot to the touch but not too hot that it burns you)
2 1/2 cups hot water (again not so hot that it burns you)
1/2 cup plus 2 tbs vegetable oil

Stir approximately 6 cups four, salt, yeast, sugar, and potato flakes together in a large mixing bowl or heavy duty stand mixer with dough hook (this is a really large batch). Add oil, hot milk, and hot water to dry ingredients and stir well. Gradually add more flour until dough is kneading consistency. If using a stand mixer add enough flour until dough starts to cling to dough hook, but it will still be quite sticky. Knead until smooth. Place dough in greased bowl and cover. Let rise until double in size. Punch dough and shape into 1 lb loaves. Place in greased bread pans. Let rise again until double in size. Bake in a 350 degree oven for about 20-25 minutes. Bread should be a nice golden brown color. While still hot rub top with some butter or brush on melted butter. Turn out onto a wire rack and allow to cool completely. Store in air tight bread bags and enjoy.

Note: you can definitely make some amazing potato rolls out of this recipe. I actually made half of the dough into rolls and the other half into a loaf.