Monday, September 19, 2011

Zucchini Bread

Just when I think our zucchini plant is slowing down it goes and produces a million more zucchini! Luckily I have a few zucchini recipes up my sleeve that I haven't shared with all of you yet!

First I must tell you that my husband and I are currently on a chia seed kick! I blame my mom for this! I had never even heard of the stuff until we were over at their house. They eat it in their oatmeal almost every morning. My husband has since spent the last few weeks reading about chia seed and all its wonderful properties. Come to find out chia is quite good for you and keeps you full longer. You might have noticed that I added chia to these waffles. I also added it to this bread. Please note that the chia seed is completely optional, but it does add a little extra nutrients if you happen to have it on hand.


Zucchini Bread

3 eggs, beaten
                                                                                               
1 cup oil
2 cups brown sugar
3 tsp. vanilla
2 cups zucchini, grated fine or pureed 

1/4 cup chia seed
2 cups whole wheat flour
1 cup white flour
1 tsp. salt
3 tsp. cinnamon
1/4 tsp. baking powder
1 tsp soda

1/2 cup turbinado or raw sugar
 

Grease 2 loaf pans with either butter, shortening, or coconut oil. Sprinkle 1/4 cup turbinado or raw sugar in each pan. Shake sugar around the bottom and sides of pan to coat all sides (as if you were flouring the pan but with sugar).  Sprinkle chia seed in the bottom of a medium size bowl. Place a fine mesh strainer over bowl. Pour grated or pureed zucchini with all its juice in strainer and allow to drain into the chia seed. This will soften up the chia seed. Set aside and allow chia to soak up zucchini juices for at least 10 minutes. In a stand mixer beat eggs. Add oil brown sugar and vanilla. Add 2 cups drained zucchini. Using a fine mesh strainer pour soaked chia seed into strainer to drain any excess liquid. Add chia seed to mixture. Next add whole wheat flour, white flour, salt, cinnamon, baking powder and soda. Mix until well combined.  Place batter in 2 loaf pans.  Bake at 350 degrees for 1 hour. (I doubled the batch and made 3 loaf pans and 1 bunt pan).


Friday, September 16, 2011

Chicken Enchiladas

Have I mentioned that I am on a freezer meal kick right now? Well if not, I am. It has been a lot of fun making things and I have already started eating some of them! I knew I wanted to do chicken enchiladas. I have never made them to put in the freezer, but I thought they would work quite well. I realized that I had never actually made the traditional chicken enchiladas. I have made several different varieties of chicken enchiladas, some of which I am sure I will post on here eventually. Growing up my mom mostly made us cheese enchiladas (well at least that's all I remember). I always liked those enchiladas. I am sure there is absolutely nothing healthy about them and that is why I loved them. When I moved off to college I had a roommate that was very picky. She introduced us to a very simple, basic, non-mexican style enchilada. These were the two styles of enchiladas that I was used to. I have since started trying even more types of enchiladas and love them all! This recipe is one that I just threw together so I could put it in the freezer. I wasn't really sure how it was going to turn out. The other day we decided to eat some of the freezer enchiladas and I was very happy with the results!


Chicken Enchiladas

2 lbs shredded chicken
4 oz cream cheese
1/2 tsp cumin
1/2 tsp salt
1/2 tsp pepper
2 clove minced garlic
1 cup mozzarella (or cheddar) cheese
8 flour tortillas
1 can enchilada sauce

Combine shredded chicken and cream cheese. Mix until cream cheese is well combines with the chicken.  Mix in cumin, salt, pepper, and minced garlic. With a spoon or fork scoop out a small piece of chicken and taste it. If it isn't quite as flavorful as you would like ad a little more spices (I have a hard time using exact spice measurements) Mix in 1/2 cup mozzarella or cheddar cheese (whichever you prefer). Using one tortilla at a time place a couple tbs of chicken mixture along center of tortilla. Roll up tortilla around mixture. Place in a 9X13 pan or 2- 8X8 pans. Repeat with remaining tortillas until chicken mixture is gone. Drizzle enchilada sauce over rolled tortillas. Top with remaining cheese. Bake at 375 degrees for 15 minutes or until cheese is melted and heated throughout.

Freezer directions: Prior to baking place pan in freezer and let freeze over night. You can then soak pan in warm water for a few minutes and remove frozen enchiladas from your 8X8 pan and slide it into a gallon size zip lock freezer bag. This frees up you pan and gives you more room in your freezer. Return bag to freezer until ready to use. On baking day remove frozen enchiladas from bag and place back in 8X8 pan. Place in cool oven and set temperature to 375 degrees. Bake for 30-40 minutes or until heated through and cheese is melted.

Wednesday, September 14, 2011

Basic Calzones

This week I have been making freezer meals. Lots and lots of them! It has been fun to just make a bunch of meals on a day off and know that some day in the future I can sit back and relax but still eat a home cooked meal. When trying to figure out what freezer meals to make one of my friends suggested calzones. I thought this was a great idea! I love pizza but this is an easier way to freeze a pizza!

Feel free to use whatever toppings you want. This is a very basic recipe that can be changed and adapted to whatever your likings are.


Basic Calzones
Makes approximately 6-8 medium sized calzones

Dough:
2 1/2 cups warm water
4 teaspoons instant yeast
4 tablespoons sugar
2 tablespoon honey
2  tablespoon olive oil
4 teaspoons salt
3 cups all-purpose flour
3 cups whole wheat flour

Toppings:
2 lbs shredded mozzarella cheese
1 pkg pepperoni
1 jar pizza sauce or spaghetti sauce

Make the dough the night before or early the morning on the day you want to make the pizza. In a large mixing bowl (or in the bowl of a stand mixer), mix the water, yeast, sugar, honey and oil. (If using active dry yeast, increase the amount of yeast to 2 3/4 teaspoons and proof the yeast in the water until foamy before mixing in the sugar, honey and oil.) Then mix in 1 cup flour and the salt. Continue mixing in all the remaining flour until you get a nice, soft dough. Knead until dough is soft and smooth, about 10 minutes by hand or 5 minutes with a stand mixer.
Shape the dough into a ball and place in a lightly greased bowl and cover tightly (with a lid or plastic wrap). Place the dough in the refrigerator to slowly rise until three hours before baking. Three hours before baking, remove the dough from the refrigerator and let it come to room temperature, keeping it lightly covered.

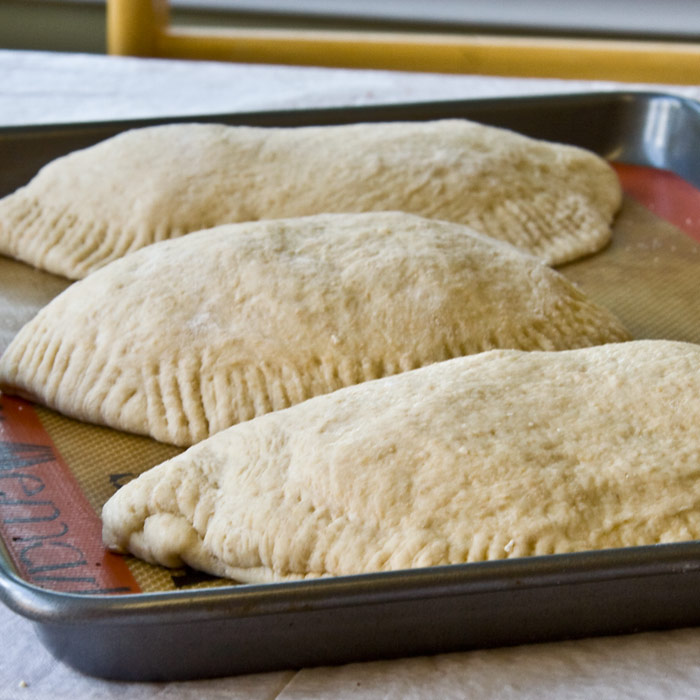
The next day remove dough from fridge about an hour before using. After hour has passed separate dough into 6-8 equal sized pieces. Cover each piece and let rest for about 10 minutes. Using a nonstick mat or a lightly greased counter top, working one at a time, start flattening each piece of dough into a circle.Eventually you’ll want it between six or eight inches in diameter. On the bottom half of the circle spread pizza sauce. Top with cheese and pepperoni (or desired toppings). Grab the top edge of the dough and fold over the toppings. You can stretch the dough if needed to cover entire toppings. Using the tines of a fork, press the edges of the calzone together until well sealed. Carefully lift and place each calzone on a silpat or parchment lined baking sheet.You should be able to fit about 3 moderate sized calzones on each baking sheet. Bake at 400 degrees for 14-15 minutes or until golden brown.

Freezer meal instructions: After calzones are formed place on a baking sheet and place in freezer overnight. Once frozen you can remove from pan and place in zip lock bags and freeze until ready to use. The night before baking place frozen calzones on a greased or silpat lined pan in the fridge to thaw. On baking day take out of fridge 1 hr before baking to bring to room temperature. Once thawed bake as directed above.

Dough recipe source: Mel's Kitchen Cafe

Monday, September 12, 2011

Lasagna

I am very lucky to have lots of family close by. Both my husband's and my family all live withing a 45 minute drive. We always have lots of family stuff going on and are so lucky to get to see all of them so frequently. I currently have 2 sister-in-laws that are pregnant. Both are due around the same time. Even better than getting 2 nieces or nephews I get 3! Yes one of my sister-in-laws is having twins! When all is said and done she will have 5 children. We don't have any kids yet so this to me is mind boggling!  She is already pretty miserable and still has a few months left to go, so I decided I should help her out a bit. She has 3 kids and a husband to feed and always tries to make home cooked meals. I decided that I should make a bunch of freezer meals. I could keep a few for my husband and myself and give the rest to her. This way her family can still eat home cooked meals, but with very little work on her part. This was the first of my freezer meal adventure.

I have always loved lasagna. It is fairly simple to make and tastes so good. I love that lasagna actually gets better after a day or so of letting it sit. It is a great one to make the day before and not have to do much the next day. It is also a great freezer meal. I like to divide mine between two 8X8 pans, eat one and freeze one. You could even break it into small portions and make a few in bread pans if you are only feeding a couple people.

I got this recipe from my mom. It is the recipe she always made us growing up. She got the recipe from her sister. I have always loved it so thanks Aunt Jackie for a great recipe!


Lasagna

1 lb hamburger
1 small onion
32 oz spaghetti sauce
16 oz ricotta or cottage cheese
2 eggs
1 lb mozzarella cheese
1/2 lb lasagna noodles

Brown hamburger and onion in a large skillet. Cook until no longer pink and onions are soft. Drain meat. Combine meat and spaghetti sauce set aside. In a blender or food processor combine ricotta or cottage cheese and egg. Blend until smooth. This step is optional and isn't really needed if you are using ricotta cheese. Cover the bottom of a 9X13 (or 2 8X8) pan with a small amount of meat sauce. Place uncooked noodles in a single layer over sauce. Spread half of the cheese egg mixture over noodles. Add a layer of meat sauce, more noodles, then cheese mixture, and remaining meat sauce. Cover with grated mozzarella cheese.  Cover with foil and bake at 350 degrees for 1 hour.

* Freezer directions: Before baking lasagna cover with foil or lid and place in freezer for up to 6 months. If you are using 8X8 or 9X9 pans you can actually freeze the lasagna over night. The next day place pan in a small amount of warm water to loosen up the edges. You can then pop the frozen lasagna out of you pan and slip it into a gallon size zip lock bag. Not only does it take up less space in your freezer but you get to keep using your pan. On baking day slide frozen lasagna back into baking dish and let thaw. Once thawed bake as directed above.

You can also bake from frozen, but you won't want to put the cheese on until after it has baked for a while. To bake from frozen place covered lasagna (without cheese) in a cold oven and preheat to 350 degrees. Bake for 1 hr 35 minutes. Uncover and sprinkle with cheese. Bake for another 30 minutes or until bubbly.


If you are using glass pans I recommend you thaw the lasagna first. Even Pyrex pans can shatter with extreme temperature differences (trust me I know).

Friday, September 9, 2011

Zucchini Casserole

I first need to mention that every time I remember that we are already into September I want to cry. Just a little bit. Summer has just flown by! It really has been a great summer. It always seems that just as I am getting used to it being summer it is gone. Oh well. I will say that I am really excited to see all the pretty fall colors that are sure to be popping up soon.

As you may know our zucchini plant has done quite well this year. It really did take over our garden. We have been able to make lots of yummy foods and still give some away. It has been great. Here is another Zucchini recipe that really is one of my favorites! This casserole is full of flavor and really could almost be eaten as the main dish but I usually serve it as  a side. We had this at a family get together and I just knew that I had to have the recipe. We have had it several times since and I have loved it every time.


Zucchini Casserole

Ingredients:

7 cups zucchini thinly sliced
1/4 cup chopped onion
1 can cream of chicken soup
8 oz sour cream
1 cup shredded carrots
2 cups seasoned stuffing mix
1/4 cup butter melted

Directions:
In a large pot cook zucchini and onion in boiling salted water for 5-10 minutes. Drain well. In a large bowl combine soup and sour cream. stir in shredded carrots. fold in zucchini mixture. Toss stuffing mix with melted butter. Spread 1/2 stuffing mixture in a 12X7 baking dish (9X13 works too if you don't have a 12X7). Spoon zucchini mixture on top of stuffing. Sprinkle the rest of the stiffing mixture on top. Bake at 350 degrees for 25-30 minutes or until heated through.

Wednesday, September 7, 2011

Multi-Grain Waffles

I have 3 favorite types of food: Dessert (yes this one comes first), Bread (a close second), and Breakfast (depending on the day this one competes with both first and second). I have always been a breakfast eater/lover. When my mom gave me this recipe I couldn't wait long before I just had to make it! I love everything that tastes good and is somewhat healthy. These bad boys are not only full of flavor, but a good way to get in those whole grains! Thanks mom for another great recipe!


Multi-Grain Waffles

8 servings, 2 waffles each
Active Time: 30 minutes -Total Time: 45 minutes

Ingredients:

2 cups buttermilk
1/2 cup old fashioned rolled oats
1/4 cup Chia Seed (optional)
2/3 cup whole wheat flour
2/3 cup all purpose flour
1/4 cup toasted wheat germ or cornmeal (I used cornmeal because that is what I had)
1 1/2 tsp baking powder
1/2 tsp baking soda
1/4 tsp salt
1 tsp ground cinnamon
2 large eggs lightly beaten
1/4 cup packed brown sugar
1 tbs canola oil
2 tsp vanilla extract

Directions:
Mix buttermilk, oats, and chia seed (if using) in a medium bowl; let stand for 15 minutes. Whisk whole wheat flour, all purpose flour, wheat germ (or cornmeal), baking powder, baking soda, salt, and cinnamon in a large bowl. Stir eggs, sugar, oil and vanilla into the oat mixture. Add the wet ingredients to the dry ingredients; mix with a rubber spatula just until moistened. Coat a waffle iron with cooking spray and preheat. Spoon in enough batter to cover 3/4 of the surface (about 2/3 cup for an 8X8 inch waffle iron) Cook until waffles are crisp and golden brown, 4-5 minutes. Repeat with remaining batter.

Make Ahead Tip: Wrap any leftovers individually in plastic wrap and refrigerate for up to 2 days or freeze for up to 1 month. Reheat in a toaster or toaster oven.

Monday, September 5, 2011

Macaroni Grill Bread

I love bread! If a restaurant serves bread before the meal I am usually more excited to eat the bread than anything else. I don't know if it is just the fact that I am usually really hungry when they bring the bread out, or if the bread really is just amazing. Either way I love going to places that serve amazing bread. This restaurant is the same. I always love eating their bread. My mom actually gave me this recipe. She had it at a friends house and raved about it so much that I just had to get the recipe. This recipe really does come pretty close to the real thing, if I could only find some opera singer to come sing in my kitchen!


Macaroni Grill Bread
Yield: 2 loaves
Time: 1 1/2 hours start to finish

Ingredients:
1 1/2 t active dry yeast
1 C warm water
3 T olive oil
1/4 t sugar
2 1/2 C flour
1 1/2 t salt
1/4 t McCormick Italian Seasoning Grinder
1/4 t cracked black pepper
3/4 T fresh rosemary, snipped

1 egg
butter and salt


1. In the bottom of your mixer combine water, yeast and sugar. Mix it around a bit with a spoon and let it sit for 5 minutes.
2. Add the salt, oil and 1 C flour. Mix for 30 seconds to incorporate.
3. Add the rest of the flour about 1/2 C at a time, while the mixer continues to mix.
4. When all of the flour is incorporated mix on high for about 7 minutes.
5. While your mixer is doing it's fine work, get your herbs and seasonings ready to go. I like to snip rosemary with scissors. You don't want to eat any of the thick stem that rosemary comes on, only the little needles.
6. When your dough is done mixing add the rosemary, pepper and Italian seasoning. Mix just until incorporated.
7. Cover your mixing bowl with a kitchen towel and let it rise for about 40 minutes, or until doubled in size.
8. Divide the dough into 2 parts. Shape into balls and place on a sprayed cookie sheet, or a cooking stone with a bit of olive oil on it.
9. Spray a sharp knife with cooking spray and cut 2 slits in the top of the bread.
10. In a small bowl whisk an egg until frothy. Brush the egg all over the top of the loaf and into the cracks.
11. Place the loaves into a warm oven. (I set mine to 170) Let them rise until doubled in size, about 15 minutes.
12. Turn your oven up to 370 degrees and bake for about 20 minutes, or until golden brown.
13. When the loaves come out of the oven, place them on a cooling rack. Brush butter over the tops and sprinkle a little bit of salt over the top of the butter. Be careful to not get too much. I always use freshly cracked salt. You can buy both salt and pepper crackers at Costco these days. Look on the spice aisle.


Recipe Source: Jamie Cooks It Up!