Monday, October 17, 2011

Divine Caramel Sauce

I have been in an ice cream mood recently. I have mostly been thinking about ice cream toppings recently. Maybe its because we went to my favorite ice cream place this last weekend. Or maybe it is because I can't help but dream about sweet ooey gooey things. Either way I have been thinking about caramel sauce and all its wonderfulness. I absolutely adore a good caramel. None of this low fat or no fat stuff. I actually really don't like store bought caramels (most of them). I love the kind of caramel that is made with lots of good butter and cream. I mean if you are going to eat it on ice cream what is the point of going low fat? That's right, there is none, so go ahead, give in to your inner caramel snob self, and make this delightful caramel. You won't be disappointing!


Divine Caramel Sauce

*Makes about 1 1/2 cups sauce

1/4 cup water
1 cup sugar
1/2 cup (1 stick) butter, cut into 8 pieces
1/2 cup heavy cream (room temperature or slightly warmed preferably)
1 teaspoon vanilla
pinch of salt

In a small, heavy saucepan, combine the sugar and water. Set the pan over low heat and stir the mixture gently until the sugar is dissolved. I don’t ever get a completely clear syrup but I let it warm over medium-low heat (a 3 on my stovetop) for at least 6-10 minutes before moving to the next step. To be sure the sugar is dissolved, I’ll dip a spoon in the sugar mixture and then gently slide my finger over the mixture on the spoon and take a taste. If the sugar is dissolved, the syrup will be smooth and not at all grainy. If you still feel grains of sugar, keep stirring over low heat until it is completely dissolved. Make sure the sugar is completely dissolved before letting the mixture come to a boil. Once the sugar is completely dissolved, increase the heat to medium or medium-high and bring the syrup to a boil. Cover the saucepan and let the syrup boil for 2 minutes. Uncover, reduce the heat to medium, and continue to boil the syrup until the edges start to turn golden brown. Carefully and gently stir the syrup until it turns a deep amber, caramel color. On my stove, this takes about 5-7 minutes.

Remove from the heat and add the butter. Gently but quickly stir until the butter is incorporated. Stir in the cream. If the sauce becomes lumpy and isn’t whisking together, set the pan over low heat and stir until smooth. Stir in the vanilla and salt.

Serve the sauce warm or at room temperature. Store the sauce in a jar or airtight container, tightly sealed, in the refrigerator for up to 1 month. Reheat on low power in the microwave or in a saucepan, adding a tablespoon of two or water, if needed, if the sauce is too thick.

Recipe Source: Mel's Kitchen Cafe

If you are having trouble you can also check out This site for helpful hints and tips

Friday, October 14, 2011

Cinnamon Ice Cream

My husband and I have been fortunate enough to go on a couple of cruises. We absolutely love cruises. Our 2 favorite cruises have one thing in common...ice cream! Now the ice cream itself didn't necessarily make the cruises our favorites, but they sure didn't hurt. The first cruise we went on together was a Disney cruise in the Caribbean. It was amazing. We had a great time, but here is where the ice cream comes in. On Disney's private island they had soft serve cookie dough ice cream! Soft Serve! This ice cream wasn't just flavored like cookie dough, no it actually had chunks of cookie dough in it. I didn't even know that was possible with soft serve. It was probably the best cookie dough ice cream I have ever had. We pretty much camped out by the ice cream lady for a while, but sadly we had to leave the island and now it is just a very very fond memory in my head. Now our other favorite cruise was our recent cruise to Alaska on Holland America. Everything was wonderful on this cruise (don't even get me started on their amazing ceramic loungers), but one day we went to the ice cream counter (a daily/multiple times a day activity for us) and they didn't have cookies n cream ice cream that day. Cookies n cream ice cream is typically my favorite. I was slightly saddened, but decided to branch out. The fun flavor of the day was cinnamon. We decided to try it, and it has forever changed our life. Cinnamon ice cream in a waffle cone might be one of the most awesome things in life. For the next few days of the cruise we got at least one (notice the at least part) of those ice cream cones a day. On the second to last day of the cruise they decided to switch out their flavors again. We were devastated. By this time we were on a fist name basis with the ice cream guy. His name was Zaldy (very cool name). At the end of the day we gave him such a hard time about not having the cinnamon ice cream he said he would try and find some for the next day. Zaldy came through for us! We got the eat one last amazing cinnamon waffle cone before we had to go back to reality. When I got home I just knew I had to search out and find a recipe for cinnamon ice cream. I tried a couple different recipes, but this one was by far my favorite and most similar to the wonderful ice cream on the cruise!


Cinnamon Ice Cream

1 cup (240ml) whole milk
¾ cup (150g) sugar *
pinch of salt
four 3-inch (8cm) cinnamon sticks, broken up
2 cups (480ml) heavy cream
5 large egg yolks

Warm the milk, sugar, salt, cinnamon sticks and 1 cup (240ml) of the cream in a medium saucepan. When it comes to a boil, cover, remove from the heat and let steep at room temperature for 1 hour – mine steeped for almost 2 hours.
Rewarm the cinnamon-infused milk mixture; pour the remaining 1 cup cream into a large bowl and set a mesh strainer on top.
In a separate bowl, whisk together the egg yolks. Slowly pour the warm mixture into the yolks, whisking constantly, then scrape the warmed egg yolks back into the saucepan.
Stir the mixture constantly over medium-low hear with a heatproof spatula, scraping the bottom as you stir, until the mixture thickens and coats the spatula – do not let it boil.
Pour the custard through the strainer into the cream and discard the cinnamon sticks. Set aside to cool then refrigerate for at least 5 hours.
Freeze it in your ice cream maker according to the manufacturer’s instructions.


*If you prefer to use honey as your sweetener of choice reduce to 1/2 cup honey. The honey does give it a slightly different taste but is still amazing.

Here is another great way to eat this ice cream! I used my perfect chocolate chip cookie recipe and voila! Heaven!


Recipe Source: Technicolor Kitchen

Wednesday, October 12, 2011

Browned Butter and Sour Cream Cornbread

Those of you that know me, or who read my blog frequently might know that I have an affinity toward browned butter. I have used it in several recipes, and have always loved the results. It adds such a richness to the flavor of things. Well today when I was at work I saw this recipe and knew I had to try it! This corn bread is not too sweet. It is a perfect sweetness for spreading some honey butter or just honey on top.


Browned Butter and Sour Cream Cornbread

Ingredients

4 tablespoons unsalted butter
1 teaspoon vegetable oil
1 1/2 cups stone-ground cornmeal
1/2 cup all-purpose flour
1/4 cup sugar
2 teaspoons baking powder
1 teaspoon salt
1/4 teaspoon baking soda
2 large eggs, lightly beaten
1 cup sour cream

Instructions

Melt butter in a small saucepan over medium heat, swirling often until lightly browned and nutty, about 4 minutes. Pour into a medium bowl, and set aside to cool.

Preheat oven to 400 degrees. Rub an 8-inch cast-iron skillet with the oil; place in oven to heat.

In a large bowl, combine cornmeal, flour, sugar, baking powder, salt and baking soda. Add eggs and sour cream to cooled butter, whisking well. Pour into dry ingredients, and stir just to combine, taking care not to overmix. Pour batter into skillet. Bake until golden and a toothpickinserted in the center comes out almost clean, about 20 minutes. Let cool in skillet 5 minutes, then turn onto a wire rack.

Recipe Source: Relish

Monday, October 10, 2011

Olive Garden Alfredo Sauce

Oh how I love food! There are a few restaurants at which I always seem to get the same thing over and over again. Olive Garden is one of those places for me. I have tried to figure out how they make such good Alfredo sauce. I have tried several different recipes, all of which have turned out good, but not quite the same. The other day I was talking with some of my wonderful co-workers discussing food (of course). Olive Garden, their bread sticks, and their Alfredo sauce came up. We were all stuck on the idea and practically salivating just thinking of it. I called my sweet husband and had him go pick us some up. It was wonderful! While we were on their website we realized that they had recipes. They actually have their Alfredo sauce recipe on their site. I of course had to try it just so I could share with all of you my results. I'm not really sure that it is 100% the same, but the taste is pretty much amazing. This is the best Alfredo sauce I have ever made. I will continue to try and tweak it to see if I can't get it to taste just like the real stuff.


Alfredo Sauce

Prep Time: 10 minutes
Cook Time:10 minutes
Serving Size:4
Ingredients

1 1/2 cup milk

1 1/2 cup heavy cream

1/2 cup imported Parmesan cheese, grated

1/2 cup imported Romano cheese, grated

6 egg yolks from fresh jumbo eggs

Salt and black pepper to taste


Procedures

HEAT milk and cream in a heavy bottom saucepan until it begins to simmer. Turn off heat. Slowly whip in cheese, then remove from heat.

PLACE egg yolks in a separate bowl and slowly whip in a portion of the hot milk and cream mixture. Slowly add egg yolk mixture back into remaining cream mixture. Place back on very low heat and continually stir until simmering. Take sauce off heat so it thickens. (This will increase temperature of egg yolks, known as tempering).

SEASON to taste with salt and black pepper. Serve over your favorite pasta.

Recipe Source: Olive Garden

Friday, October 7, 2011

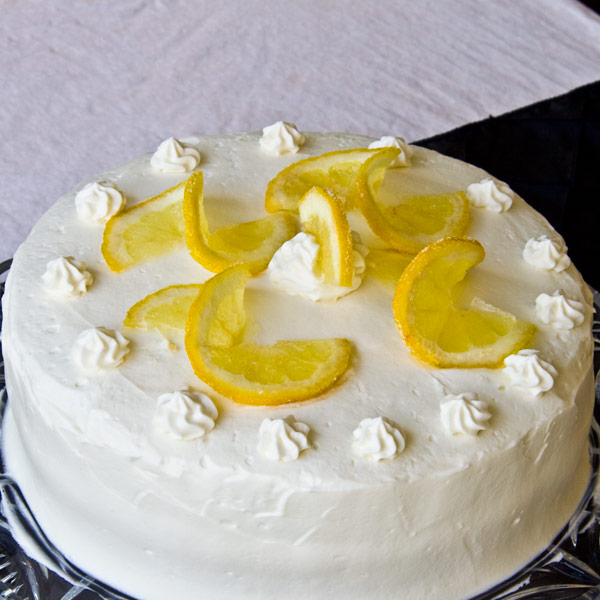
Lemon Cake with Lemon Filling

My husband and I took the long way home the other day and decided to go on one of our favorite drives. It is this beautiful drive that takes us up over one mountain and down into another valley. We accidentally stumbled upon this road when we were trying to take the scenic route home, but took the wrong scenic road. We ended up in city we weren't planning on going to, but it was totally worth the few extra miles. Luckily around here all of our cities are pretty close so it didn't take us that much longer to get home.I have been talking about the fall colors recently and how I love them. I just thought I would first share with you all a little glimpse of how our mountains are looking right now.


There still is a surprising amount of green up in the mountains so we plan enjoying the beautiful fall colors more over the next week or two.

Ok now on to more drool worthy topics. It was my brother in law's birthday last weekend and I was lucky enough to make his birthday cake. He had some very specific requests as to what kind of cake he wanted. He wanted a lemon cake with lemon filling, cream cheese frosting, and lemons dipped in sugar on it. I set out to meet this challenge, just hoping it would turn out well. I personally think that lemons are often forgotten, or not valued as they should be. I would have never thought to make him a lemon cake, but let me tell you I was sure glad that I did. The cake turned out delicious. Everyone really enjoyed the cake. The cake itself had a mild lemon flavor, the filling is tart and very lemony, and the cream cheese frosting has a little bit of tang all on its own that was absolutely delicious. I used the whipped cream cream cheese frosting that I posted the other day and it was perfect! I hope this post reminds you all of how much you love lemons!


Lemon Cake with Lemon Filling

Ingredients
2 cups all-purpose flour
2 teaspoons baking powder
1 teaspoon salt
1/2 cup butter
1 1/4 cups white sugar
3 eggs
1 teaspoon vanilla extract
1/4 tsp lemon extract
3/4cup milk
1/4 cup lemon juice

1 tablespoon grated lemon zest
1/2 cup fresh lemon juice
1 tablespoon cornstarch
6 tablespoons butter
3/4 cup white sugar
4 egg yolks, beaten

Directions:
Preheat oven to 350 degrees F (175 degrees C). Grease and flour two 8 inch round pans. Mix together the flour, baking powder and salt. Set aside.

In a large bowl, cream together the butter and sugar until light and fluffy, about 5 minutes. Beat in the eggs one at a time, then stir in the vanilla, lemon extract, and lemon juice. Beat in the flour mixture alternately with the milk, mixing just until incorporated.

Pour batter into prepared pans. Bake in the preheated oven for 30 minutes, or until a toothpick inserted into the center of the cake comes out clean. Allow to cool in pans on wire racks for 10 minutes. Then invert onto wire racks to cool completely.

To make filling: In medium saucepan, mix together 1 tablespoon lemon zest, 1/2 cup lemon juice and 1 tablespoon cornstarch until smooth. Mix in 6 tablespoons butter and 3/4 cup sugar, and bring mixture to boil over medium heat. Boil for one minute, stirring constantly. In small bowl, with a wire whisk, beat egg yolks until smooth. Whisk in a small amount of the hot lemon mixture. Pour the egg mixture into the sauce pan, beating the hot lemon mixture rapidly. Reduce heat to low; cook, stirring constantly, 5 minutes, or until thick (not to boil).

Pour mixture into medium bowl. Press plastic wrap onto surface to keep skin from forming as it cools. Cool to room temperature. Refrigerate 3 hours.

To assemble the cake, trim off any excess on the top of each cake so that when they are placed on each other they will sit as flat as possible. Place bottom cake layer on a cake pan. Spread with lemon filling. Place second layer on top of filling. Frost as desired.


Recipe Source: Adapted from Allrecipes

Wednesday, October 5, 2011

Whipped Cream Cream Cheese Frosting

This frosting is so good that I think it deserved its own post. I absolutely love cream cheese frosting. I think they are heavenly especially when combined with some sort of delectable cake or brownie.  Most cream cheese frosting are heavy and rich (not a bad thing if you ask me). This cream cheese frosting is light and airy, but yet still full of flavor. It would go perfectly on just about any cake. I used it on a delicious lemon cake that I will post in a couple of days.


Whipped Cream Cream Cheese Frosting

Ingredients
1 (8 ounce) package cream cheese (at room temperature
1 1/4 cup white sugar
1/8 teaspoon salt
1 teaspoon vanilla extract
1 1/2 cups heavy whipping cream

Directions
In a small bowl chilled beat whipping cream until very stiff peaks form (if you beat it any longer it will probably turn into butter); set in the fridge.
In a large bowl combine cream cheese, sugar, salt and vanilla. Beat until smooth, then fold in whipped cream. Frost cake as desired.

*Note: This is a very soft light frosting. I was able to frost a 2 layer cake with it and pipe with it a small amount, but this is not an ideal frosting for piping, but it is an ideal frosting for eating so do with it as you please. This is also a delectable fruit dip.


Recipe Source: Adapted from Allrecipes

Monday, October 3, 2011

White Chocolate Popcorn

I first must say that I am loving the fall colors. I think I have accepted the fact that it is fall and that winter is coming. I do love fall. I think I would love fall even more if it wasn't followed by freezingness. Oh well I love fall. I love the trees changing colors. I love that it is cold at night, and the crispness in the air. We live in an area that we have lots of mountains near us and we get to watch all the trees and mountains turn bright red, orange, and yellow.  What more do you need on a beautiful autumn day than some nice white chocolate popcorn? Ok ok I know that this might not go together like one would hope, but when is a bad time for white chocolate popcorn? I had this popcorn years ago at a friend's aunt's house and it was better than any white chocolate popcorn I had ever had. When she told me how simple it is, and the one secret that makes it awesome...I was sold. I have made this several times throughout the years and love it every time. The funny thing is that I'm not a huge fan of white chocolate. I actually don't like to eat this popcorn until the chocolate has hardened onto the popcorn. The combination of the white chocolate and the salty butteryness of the popcorn blend together to give it the flavor that I love. If you are thinking about skimping on the buttery popcorn think again. You will just have to trust me when I tell you that it makes it awesome. Try it and you will be sold!


White Chocolate Popcorn

2 bags buttery microwave popcorn (buttery or extra buttery preferably)
12oz white chocolate

Place white chocolate in a microwave safe bowl. Microwave in 30 second intervals stirring chocolate after each 30 seconds until white chocolate is all melted and smooth. Set aside. Pop microwave popcorn per box instructions. Place popped popcorn in a large bowl being careful to remove any un-popped popcorn kernels. Pour melted white chocolate over popped popcorn. Stir popcorn until white chocolate is evenly dispersed throughout the popcorn and coats every kernel. Keep stirring for a few minutes to make sure everything is well coated and mixed. Allow to cool and chocolate will harden on popcorn. Enjoy.